|
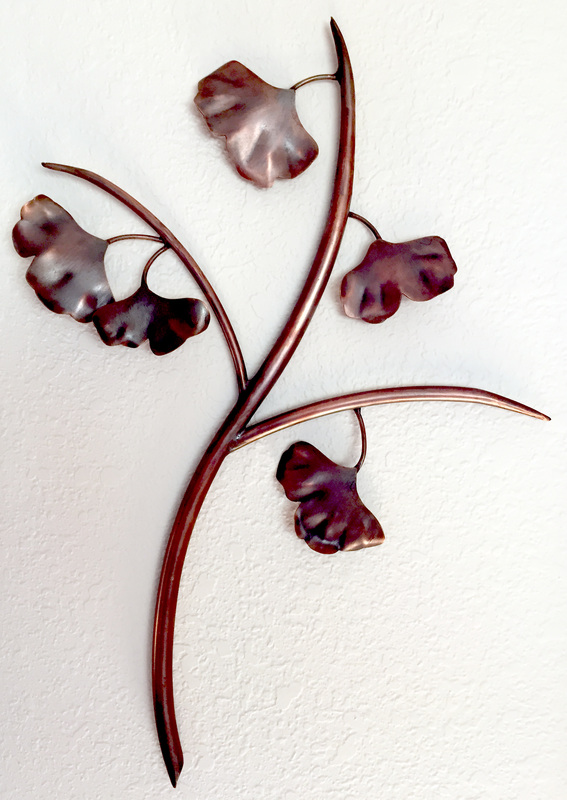
Copper Gingko Sprig
Approx. 12"x18" (30.5cmx45.7cm) 3/8" and 1/4" soft copper refrigeration tubing 0.032" (0.75mm) copper sheet 0.125" (3.2mm) solid copper wire Fabricated, brazed, chemical patina |
I am a very, very fortunate person. This is true for many reasons. The one that's relevant to this page is that I live in Northern California, where there are many artists, craftspeople, and makers all doing remarkable things. And being here means I get to meet them, talk to them, learn from them, and see their work in person. Every once in a while, I even get to take something that is a result of their skills and creativity home with me (budget and space permitting!) because it is literally irresistible.

|
One of the craftsmen I'm happiest to have met (and studied with!) is David Burns of Copper Gardens in Rough and Ready, CA.
David is a true artist-craftsman, an excellent teacher, and he and his wife Annie were gracious hosts for the day I spent with them. Rough and Ready, CA (I kid you not, that's where David lives) is a bit off the beaten path but if you want to learn a lot about working with copper in a short time, I can't think of a better way to do it than making the trek to David's workshop. I took David's basic copper fabrication class a few years ago. It was an eye-opening experience. In a single (long!) day, David shared with me enough of his trove of copper working knowledge to enable me to get started in the craft of copper fabrication. |
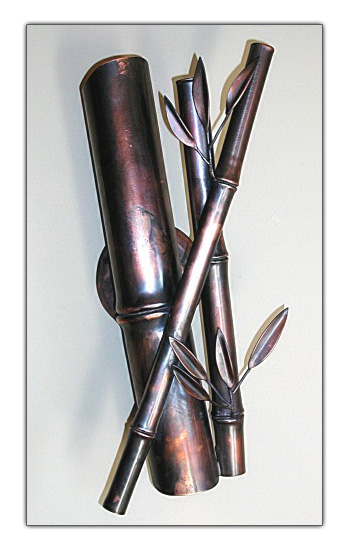
image from coppergardens.com
|
The products of David's skill and imagination are many and varied. A quick visit to his youtube channel will give you a great overview of David's work. Actually, your visit is unlikely to be quick as you will most likely find yourself watching video after video and marveling at the designs and craftsmanship that flow from David's mind and hands.
One of David's signature styles is copper bamboo. Check out the Copper Bamboo Side Table project page for my first attempts at putting what David taught me to use. Note that I bear full responsibility for the stiffness and severity of the table design. David's copper bamboo is fluid, graceful, and natural... |
For the class project David suggested something not too complex, so we could go from raw copper to patina in one session. I chose a variation of one of his standard student projects - a sprig of foliage from a tree. In a fit of typical "if it's worth doing, it's worth overdoing" thinking, I chose to do a gingko sprig instead of the more straightforward sprig bay or olive. I still remember very clearly the "What, are you nuts?" look on David's face when I asked if I could do a gingko. I guess the leaves are a bit more complex than those that usually go on a first project.
I won't attempt to describe here all of the steps and methods David shared with me. The many video's on David's youtube channel already to a far better job than I could do of explaining how to get started. Just go watch the videos! I did put some step-by-step description on the Copper Bamboo Side Table project page and the basic methods are the same as those used to make the gingko sprig.
One way I knew that I was studying with someone who not only knew his craft, but who could also pass his knowledge on to his students, was the ease with which I was able to sit down the following day and write out a set of notes about what I had learned. We were moving fast and concentrating hard on "making" while I was there, so I didn't have any time to take any notes. Even so, it was easy for me to visualize most of what we had done and get it down on paper for future reference.
With David's permission, what follows are the notes I made the day after the class. Even though David's youtube channel already does its viewers a great service in sharing his methods, I thought visitors here might benefit from the sequential trip through the process.
In another sign of his seemingly endless generosity, David also took the time to correct/clarify/elaborate on my notes after I sent him a copy! In the notes below, David's comments are in gold.
Materials
Copper
Tubing/pipe
Soft copper refrigeration tubing, various diameters - should be annealed as rec'd, when in doubt anneal anyway
Copper pipe - the usual stuff from the plumbing supply store, anneal before forming - Correct, unless you are doing minimal forming or shaping … it will anneal where it is joined and if no other shaping is needed, annealing is unnecessary
Sheet
16 oz (pretty wimpy), 24 oz. (thicker but still easy to work with and final leaves are still "light") - Even thicker material is good, but most applications may not require it … consider splitting pipe scraps, using the band saw, to salvage for small dimension components (leaves, etc.) to fully utilize otherwise hard to salvage material
base plates for branches etc are even thicker - maybe 48 oz? (mic the sample I have to verify) - 48oz is good for capping ends
Brazing rod
Harris 0 (means 0% Ag in alloy) - correct!
self-fluxing Phos-Copper - close enough, “flux” is really a different process, however, it is the Phosphorous in the mix that “cleans” the joint
.050" thick x 1/8" wide by 20" (?) long sticks, available in many other forms - this (.050 x 1/8”) is the best form to use, others are unwieldy
Ag containing alloys flow much more easily & are difficult to keep from flowing too far/well - like when trying to seal a taper
Ag alloys are good for building up low spots in a joint if needed - Not precisely, they simply flow faster (at a lower temp.) thereby allowing a quick build up without moving the underlying brazing material … for maximum build up, 0% is still best … you can “stack” it more redily than anything with Ag in it.
Ag alloys are crazy expensive – or worse!
Patination & cleaning chemicals
Sur-fin Chemical Corp, - http://www.surfinchemical.com/
surfinchemical.com – yes, when contacting them, ask if they still offer a “starter kit” … previously, they supplied new clients with a selection of chemicals, your choice and up to eight I believe, at a very modest “starter” price. This gives you the chance to learn what you can do with their various chemicals (they have a ton of them) before you commit to the pricy gallon quantities which you will have to buy once you are in “production”
SUPERANTIK 44 Black Antique (?) – My favorite antique color comes from their Antik (sic) 30 … there is an Antik 40 and others … refer to the “starter kit” idea above
Brush 'n Clean (?)
Dishwasher rinse aid (e.g. Jet Dry) – one of those drop dead simple, but very important little items
Tools & Equipment
Bandsaw
14" wood cutting bandsaw, running on lowest speed – cheap Chinese junk from Harbor Freight works fine … hold your nose and commit unless you are ready to spend $1,200 to $2,000 for something better
1/4" 14 tooth raker blade – yes or even closer tooth spacing is OK 18 to 24, but 14 is cheaper and just fine!
wax lubricant
zero clearance insert of sheet steel double sided taped to top of table (use magnets instead?) – I love the magnet idea and I found them on Amazon but have not pulled the trigger yet, will do so soon! BTW, at first, while the standard plate that comes on the machine is relatively unscathed, you will not need this. When the blade has been forced side to side under normal use and the the pass-through slot becomes enlarged, bits of the work become lodged in the slot and really make a mess of your cutting process
Belt sander
1" for most shaping/cleanup of sheet metal parts – again, cheap Chinese junk is OK, I hate myself every time I buy their crap, but sometimes I cannot help it, especially if I am not certain it is the correct tool in the first place … it’s a cheap learning process, one that can be fixed with the application of too much money later!
2" for serious stock removal (like pigeon poop welding!) – these are really expensive and you may be better served with a 4 ½” hand held grinder with a flap disc for 99% of your needs
shorten belt backing plate to allow for more flex in the belt to work around curves – works like magic
Belt grit? – 80 is a good compromise … it’s nice to have 60’s and 120’s for occasional use as it become apparent that it will be handy
Air Die grinders
Right angle
2" roloc sandpaper
2" roloc non-woven surface conditioning discs (3Ms are 2x cost of off-brand, off-brand works fine)
grit for paper (60? or 80?) + pad?
sources? Enco? – see attachments of Enco Catalog pages and item numbers (gawd, now I have to remember to do this)
Straight
4" (?) Thin and thick reinforced abrasive cut-off wheels (thickness?) –thickness of .035” … this is nice and very thin and would be a good choice … up to 1/16” is still “thin” but the 1/8” wheels are something I use to “carve” with
thin ones are used to clean/cut the base of a v-groove cut for a taper end on a tube … - and they require less power (air) to make most other cuts
Electric angle grinder
heavy and unwieldy! – but mandatory in any shop
4" non-woven abrasive discs – source – A Cut Above, http://www.acutabove.com/ - I will attach a photo copy of the back of the wheel for you to take the precise nomenclature from
used to put final even finish on work before coloring – among other processes, but one of the best!
grit? source? – as above
(why not use a finer surface condition disc as above in the much more maneuverable air grinder?) – would buy them in a heart beat if they were available … so far, I have not been able to find such a critter and I am guessing that they would be short lived and that may be the reason they are not manufactured … dunno
grinding your knuckles with this tool is not recommended - ouch!
Air Compressor
7.5hp unit will just barely keep up with four students! – for a modest home shop, a three h.p. may be adequate, you just have to get used to having other productive stuff at hand to remain efficient while air builds up … or take a rest!
Torch
oxy-acetylene – nothing else comes close, don’t even consider it (propane, mapp gas, etc.) all produce the correct temps. but not fast enough to keep ahead of the heat transfer of the copper unless you are doing tiny bits and pieces.
Hoke torch with small tips – my small torches are called Meco and can be purchased from TM Technology (a good friend) http://www.tinmantech.com/
"gas saver" shut-off valve with pilot removed (use electronic striker to light) – also from the Tin Man above (do get his catalog, it is informative and very, very useful)
Welding/assembly table
1/2" (!) steel top, very flat – this is ideal, 1/4'” would save money and be very nearly as good … wood - verboten!
can take the heat w/o warping or burning, but don't torch directly on it more than necessary – that’s the point
Shot Bags
leather/suede with lead shot – Tin Man again
lead is better than the replacements (bismuth maybe?) – better by a ton
Techniques
Design
variety in shapes is good – “the imperfection of handwork is exactly the ‘perfection’ I am looking for”
odd numbers (especially 3 & 5) are good – at low numbers, beyond 7 to 9, the eye loses the ability to be critical
draw out full size cartoon on butcher's paper – as time goes by, this may become less necessary, but it is the very best way at first!
Cutting and tapering tubing
use bandsaw
cut to length
long taper cuts should climb concave away from the tip (like a saturation curve) to make it easier to close up tightly – more to gain a proper taper than to make it easier to bring together … a flat or concave cut will wind up with a nasty bump at the terminous and will be nearly impossible to finish to a fine, blended taper
blunt end cuts should also climb away from the tip to make it easy to form base plate around end – shape is less important in terms of ease of application of the cap, but most important to reveal a nicely finished end and not an open tube looking very incomplete
after cutting the primary curve with the bandsaw, use a thin cut-off wheel in the die grinder to continue the 'V" at the base of the cut to a sharp point – you got it
when cutting the "V" be sure to keep the cutoff wheel off the back side of the tube - it's easy to cut into it by accident
lay the tube on it's side on the anvil and tap the sides of the tubing together until the edges touch or nearly touch
turn the tube upright and tap along the seam at the top to level the edges and tighten the seam – spot on!
Brazing in general
fixture work on assembly table as required w/ bricks, metal blocks/shims, etc to place seam where it's easy to get at
cheap spring clamps attached to the end of the work piece (far from the torch!) make a good fixture
joints should be reasonably tight but braze rod will fill small gaps
oxy/acetylene is preferred because it has hottest flame
metal is hot enough to join when it gets "shiny" in the flame – this is tough to learn, suggest practice on scraps
touch down with rod to see if ready to melt
if rod sticks DO NOT jerk away and mess up the layout - just melt the rod off the piece
make sure you get a good bead all the way around the pieces
overheating a joint will boil the brazing and make a rough joint (with porosity?) – exactly the reverse is true, too cool will produce porosity, heat will cause a smooth finish … the difficulty is in getting the correct balance between enough heat to flow well and too much so that it all runs away … (how do you get to Carnegie Hall? Practice, Practice, Practice!)
Under heating the metal can leave voids in the brazing – yes, but a fussy little bit of trivia that could be misleading, Carnegie hall will cure all the above
recently brazed metal is sort of hot, so you probably shouldn't touch it – aw, go ahead, try it
Brazing a seam on tapered tubing
braze from tip to root (if do it the other way, tip gets so hot that it's hard to fill the end fully)
heat work and rod to form a round droplet on the tip
move rod and flame along seam to lay down a generous bead (but not pigeon poop!) –Balance, balance, balance!
Cleaning up a brazed taper
if you way over do it with the braze rod, use belt sander to grind it down
use (60? or 80?) grit disc on right angle grinder to further smooth – either grit is OK
use surface conditioning disc to complete cleanup
always keep tool and work in motion to prevent making flats on the work
to follow curves more easily, can use a 2" sanding disc on a 1" arbor to make disc more flexible – yes, but not all the time, the need for this trick will become clear in time … generally, use a 2” backer with a 2” disc and the 1” where it is clearly an advantage
Capping the end of a tube
clean up end of tube to make flat surface for capping
trace around tube to be capped onto thick (48 oz?) copper sheet
cut out cap w/ some margin all the way around
tin entire area on cap with braze rod
touch down thinnest/pointiest end of tube to cap and heat until tacked down
tap cap down tight against end of tube
braze rest of seam around cap – perfect!
grind off excess cap margin and braze metal around tube
DO NOT grind at an angle and under cut the cap or can open up the seam - yup
Joining pieces of unequal thermal mass
heat management is the key - as in jewelry
play heat on larger mass to bring up to temp before heating smaller mass
for leaf stem, spatulate the end of of the stem and solder to back of leaf
when attaching leaves, bias joint towards back of branch – spatulate also called “coining”
Cleaning up a joint
don't over do the cleanup - need to leave sufficient braze metal to make a strong joint
flexible sanding discs and surface conditioning discs are primary tools
Adding hanging loops
Make double legged lollypop shape from 12g (?) Cu wire by squeezing around mandrel
Bend loop up out of plane of legs to make clearance for the screw head/hanger hook
Working with sheet metal
Cutting
choose appropriate thickness for part
draw directly on sheet w/ sharpie
make cardstock/metal/wood templates for shapes if you want to reuse them
nest shapes on sheet to maximize material yield
rough out part on band saw
don't get too fussy on the band sawing - it's hard to cut tight/exact curves and the belt sander is a great shape refiner – could not say it better myself
Shaping
refine shape on 1" belt sander
knock off burr on back side with 1" belt sander – and/or 2” surface conditioning disc on air die grinder tool
ease edges on wire wheel mounted in a bench grinder - it's easy to over do it here, so be careful
Adding volume
use shot bag or rubber pad or ? as support
plastic mallet or other tool driven by hammer
bend edges by shaping over stake – or absolutely anything else that produces results … be creative, look for shapes in scrap metal you come across, make anvils out of trailer balls, old car bumpers, pipe, RXR track, absolutely anything that holds a shape you like
Coloring
even up surface texture using non-woven pad – sometimes you will find that the 3M kitchen clean up pad is as good as you can hope for … I buy them in the Industrial strength size from Enco
use Sur-fin brush on cleaner full strength to clean parts fast – on small parts, larger things will benefit from dipping, thereby saving on chemical cost, but taking up to several hours. I make dip tanks out of anything that looks or is the right size, then line it with pond liner, fill it with water diluted chemicals and go on to other productive work while the cleaning is happening effortlessly … this for later … while doing smaller stuff, direct brushing, full strength is good.
soak in dilute (5:1 - 10:1) cleaner in water overnight if you aren't in a hurry – ah, yes, had I read further, etc.
Add a few drops of rinse aid to increase wetting of the metal surface
rinse off cleaner
dry metal completely - compressed air, etc.
brush on color with cheap bristle or acid brush
let color develop to darker than desired level
knock back color to desired level with 0000 steel wool (use ONLY 0000 steel wool, even 000 is too coarse) - perfect
Making Bamboo
Tools
stake/mandrel with lip on it to allow you to hammer over the edge of the tube
ideal to have multiple sizes for stakes to more closely match radius of tube
angle iron cradle for assembly
two short cradles with wings on them for stability
plain angle in the middle to make up total length needed – U got it!
Materials
copper pipe
Techniques
Forming
anneal about 1" on each end
don't use fully annealed tube - will bend in the middle as you work
fold over lip on ends of section on special mandrel
stand section up on bench/anvil & hammer end to bulge out ends
check that end is reasonable flat, hammer to correct as necessary – you are a bamboo making fool!!!
Brazing
place pieces in cradle & align as desired
braze top of joint
turn over and braze back
double check for holes!
Clean up
as usual per above
can use narrow cutoff wheel to accentuate deepest part of joint but don't over do it and weaken joint – this will cause you to quickly learn a careful technique for your brazing … the clean up is a vastly greater time consumer than the actual brazing process … more refined brazing = great time and disposable savings
A comprehensive review of the day is contained herein … if you refer back to this once in a while, I believe that it will enhance the value of that shop day for a long time to come … my compliments on your effort and your interest … I wish you very much joy in working with copper … I hope you gain the same sense of satisfaction that I continue to over the years.
David Burns
July 6, 2012
Copper Gardens
Rough and Ready, California
Enco Source for surface conditioning discs, and possible for air tools as well
Discs: Catalog page 259, item no. 240-3568 $0.84ea, frequently on sale for $0.54 (often online and not advertised)
Air Die Grinder: Catalog page 621. Item no. 619-3458 … $64.67 … same thing from Harbor Freight for about $20.00
Harbor Freight:
Angle Die Grinder: http://www.harborfreight.com/catalogsearch/result?q=angle+die+grinder
Several to select from and cheap
Sur-Fin Chemical: http://www.surfinchemical.com/
TPTools: excellent source for a host of tools and support supplies, get their catalog: http://www.tptools.co
|
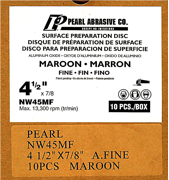
A Cut Above: http://www.acutabove.com/ as mentioned in the text … these guys are very, very helpful, but do not have on online store … you must call them and talk to a real human being … one that is possessed of language skills, knowledge, support, ideas and nurturing … all but unheard of in today’s world
Picture of the 4 ½” surface discs used for final finishing of your work, just before color is applied … thought I’d place it here rather than to add another attachment … buy these from A Cut Above by the box only … not cheap, but nothing else comes close! |
