 © Trustees of the British Museum
I've had an interest in Anglo-Saxon and Merovingian goldsmithing ever since I discovered the Sutton Hoo Treasure at the British Museum.
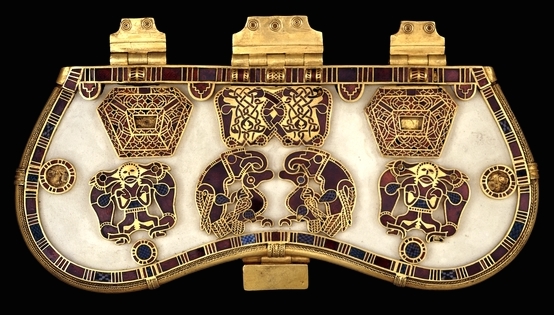
One of the most amazing artifacts in the Treasure is the Purse Lid shown at left.
Every time it see it (and I see it every time I'm in London, no matter what!) I still stand there slack jawed as I contemplate how it might have come into existence...in about AD600!
The best source I've ever found for technical information about gold and garnet cloisonné is “Merovingian Garnet Jewellery” by Birgit Arrhenius. I borrowed a copy from the library at Cal (being an alum is a good thing…) and found it to be so useful that I had the good folks at Abebooks.com send me a copy…from Sweden! Another find on AbeBooks, Coatsworth and Pinder’s “The Art of the Anglo-Saxon Goldsmith“ is also very good. It’s a very informative and clearly written general survey of the topic. The extensive footnotes keep me jumping back and forth between the book and Melvyl, on-line catalog for Cal’s libraries.
image from Amazon.com
|
After studying this kind of work for a few years, I decided to make a piece inspired by it. I chose cloisonné enamel because I thought I could achieve something close to the garnet inlay effect of the original piece. It would have been nice to make it in gold, but, well...you know. Gold.
I settled on interpretation of a pendant I first saw in Wilson’s “Celtic and Early Medieval Designs from Britain“, plate 11. (Oddly, at some point after I bought my copy the “Celtic” seems to have been dropped from the book’s title.) |
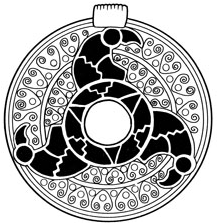 from Wilson, plate 11
The description of the plate is “Gold pendant decorated with gold filigree and garnets. Diameter 11.4 cm”. That’s a 4 1/2″ diameter pendant! I decided to make my interpretation a bit smaller…about 1 1/2″ diameter. That way if if came out okay, maybe I could give it to my wife as a pendant that she might actually wear.
 © Trustees of the British Museum
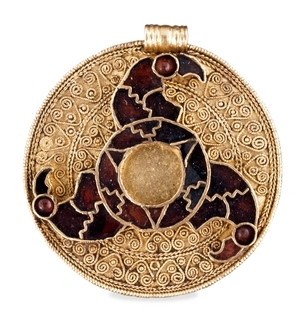
It wasn’t until a few weeks after I started playing around with this design that I found that the original artifact is in the collection of the British Museum. The drawing from Wilson is helpful, but it’s great to have a photo of the real thing. Who knew all those wire lines were twisted wire and that the small circles were twisted wire with a granule in the center?

I scanned the design from Wilson, and then painfully and laboriously created a tidied up b&w bitmap version in Adobe Photoshop. I'll never do that again. Right around that time I started using Adobe Illustrator, figured out how to use the Live Trace tool, and never looked back. Not only is Illustrator easier use for work like this, but at the end you have a scalable vector file, not a difficult to use bitmap.
After I had a good working file, the question was how to make the cloisonné wires for my version. I had two great resources to draw upon: The Art of Enameling by Linda Darty and The Techshop.
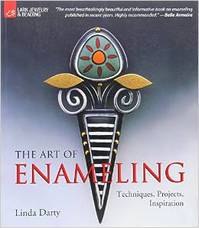 image from Amazon.com
The Art of Enameling is a well written and illustrated survey of…the art of enameling. A beginner could make a lot of progress in the craft with this book alone. In addition to the informative text and practical illustrations, there are many pictures of enamel work by a wide variety of artists throughout the book that are inspiring and useful as illustrations of the techniques being discussed.
One idea in The Art of Enameling that jumped out at me was shown on page 110. Enamelist Harlan Butt came up with a simple jig to make repetitive shapes from cloisonné strip. Butt’s jig is made from brass sheet, presumably with the shapes cut with a jeweler’s saw. I needed multiples of a variety of shapes, but if I was going to make jigs for the various parts of the bird heads and the other parts of the pendant design, that’s a lot of sawing. Doable, of course, but I had no idea if I needed to allow clearance for the strip in the jig or if there were any other nuances to making the tool. So, how to proceed with making the jigs in a way that allowed me to play around with the design quickly?
One idea in The Art of Enameling that jumped out at me was shown on page 110. Enamelist Harlan Butt came up with a simple jig to make repetitive shapes from cloisonné strip. Butt’s jig is made from brass sheet, presumably with the shapes cut with a jeweler’s saw. I needed multiples of a variety of shapes, but if I was going to make jigs for the various parts of the bird heads and the other parts of the pendant design, that’s a lot of sawing. Doable, of course, but I had no idea if I needed to allow clearance for the strip in the jig or if there were any other nuances to making the tool. So, how to proceed with making the jigs in a way that allowed me to play around with the design quickly?
Enter The Techshop. I’m lucky enough to be in the SF Bay Area and to be a member of The Techshop. Techshop is an organization dedicated to helping people (like me) who are obsessed with Making Stuff to Make Stuff. I won’t try to duplicate all the information they have on the web site, but I will say that the place is great. From the very first day I set foot in the place the people (staff and other Makers) there have been friendly, helpful, and supportive of whatever crazy thing I was up to (Need 100 pieces of 3ft x 3/16″ x 22ga copper cut to tight tolerances? No problem, let me drop what I’m doing and spend 30 mins helping you set up the shear…Want to put a beadblasted finish on metal but can’t figure out what media we have or which cabinet to use? No problem…lets wander all over the shop and find every last bit of useful material we have and see what we can do…maybe we should setup a temporary booth for you outside…). You have to like people who get it about Making Stuff.

Some of the coolest tools the Techshop has are their Epilog Laser laser cutter/engravers. You put CAD in one side and parts come out the other. Okay, it’s a bit more complicated than that, but seriously not much. After an hour of basic training, I was able to cut and engrave away: wood, plastic, coated metals…It’s a cool tool, indeed. So cool, in fact, that the lasers are by far the most in-demand tools at the TechShop.
With the laser cutter and my vector file from Illustrator, I was able to make cloisonné strip forming jigs similar to Butt’s jigs from 1/8″ acrylic sheet in almost no time. And, when I needed to fiddle the dimensions, all I had to do was tweak the CAD file and recut them. Literally a matter of a few minutes.
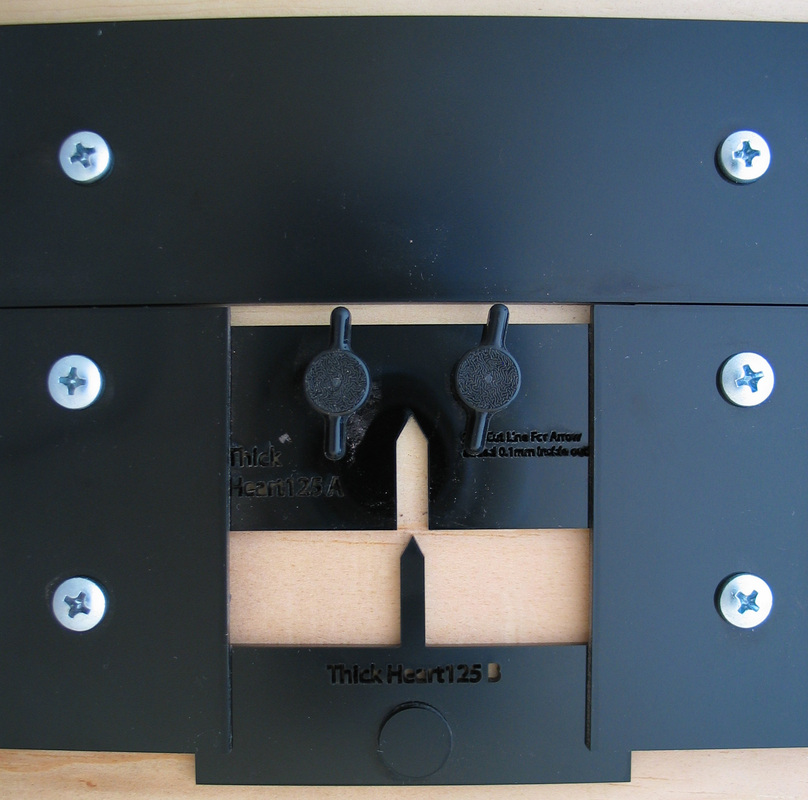
Here’s one of the two-piece jigs I made (this one makes pre-forms for the Heart Scrolls around the rim of the pendant). It’s installed in a base that makes changing out the jig for another shape a matter of backing out two screws (black plastic knobs), sliding in another jig, and re-tightening the knobs.
Using the jig is easy: cut a piece of strip, bend it roughly in half around the tip of the “punch” and then slide the punch up into the “die”. Push hard and you get a remarkably true shape (from properly annealed strip, of course!). This particular jig had to have extra clearance cut between the “punch” and the “die” for thicker strip. All of the other jigs were used to form standard cloisonné strip from Rio Grande and they worked great as cut by the laser. Rio’s standard strip is 0.13mm thick and 1.5mm tall. The thicker strip I made for the Heart Scrolls is 0.35mm thick and 1.5mm tall. Making the custom strip was easy. Just a quick trip for some 18ga fine silver round wire through a couple of holes in the draw plate (took a couple of tries to find the right diameter) and then through the rolling mill to flatten. Anneal and you are ready to go!
Using the jig is easy: cut a piece of strip, bend it roughly in half around the tip of the “punch” and then slide the punch up into the “die”. Push hard and you get a remarkably true shape (from properly annealed strip, of course!). This particular jig had to have extra clearance cut between the “punch” and the “die” for thicker strip. All of the other jigs were used to form standard cloisonné strip from Rio Grande and they worked great as cut by the laser. Rio’s standard strip is 0.13mm thick and 1.5mm tall. The thicker strip I made for the Heart Scrolls is 0.35mm thick and 1.5mm tall. Making the custom strip was easy. Just a quick trip for some 18ga fine silver round wire through a couple of holes in the draw plate (took a couple of tries to find the right diameter) and then through the rolling mill to flatten. Anneal and you are ready to go!
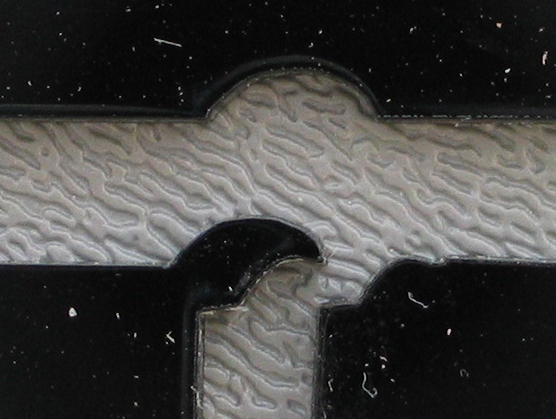
The really cool thing about the jig concept is that you can even form shapes with under cuts. The bird’s beak is a more complex shape and it took a 3 part tool. Here’s a detail shot (pay no attention to the paper towel debris all over everything!)
To use this jig, I cut a piece of strip, formed it around the left half of the punch, pushed the strip roughly into place around the tip of the beak and then forced the right half of the punch into position. Worked great.
One nuance to using all the jigs was cutting off the excess strip. Luckily, the corners of the jig make a faint witness mark right along the cut lines. Line it up with your shears, snip and you’re done. If you get it a little long, re-trimming is easy. Of course, if you over-trim…
The only major elements for the pendant design that weren’t formed with the jigs were the three circles, the three long arcs between the rows of heart scrolls, and the bird eyes. The eyes were simply formed by hand around the shaft of a transfer punch of the appropriate diameter. The other circles were formed by hand around laser cut circles of the appropriate diameter. I put a little notch in the circle that just fits the tips of my shears (Joyce Chen’s Unlimited Scissors, one of the best tools to transfer from the kitchen to the studio in a long time!). The notch makes it easy to cut the overlapped ends of the strip to make them parallel for joining.
After I cut the circles, I wanted to round them out and make them really good circles to anchor the rest of the pieces. At first I thought I’d just fuse them and I actually managed to fuse the biggest (outer) circle. After that, all bets were off and I melted a whole lot of strip. Maybe there’s a trick to fusing the incredibly delicate strip but I couldn’t figure it out.
So, Plan B was to solder the strip. In The Art of Enameling, Prof. Darty warns against using any solder containing zinc if you are going to enamel over the joint. So, eutectic solder is the way to go. No zinc, just a combination of silver and copper that give the lowest melting point possible for the binary alloy (turns out the be 28% copper and 72% silver, despite the reversed values on page 22 of Prof. Darty’s book. Even good books can have little things sneak through the editing process...). Eutectic solder isn’t as easy to come by as the normal grades of silver solder, but the nice folks at Schlaifer’s Enameling Supplies are very happy to ship you some, and fast. I got my in a couple of days and went to work. An easy road after the frustration of trying to fuse the strip. The eutectic solder works much like any other solder. You only need the tiniest pallion to solder the thin strip. Much less to clean up later.
At this point, I hit another snag. The Art of Enameling recommends that any joint soldered with eutectic solder over which transparent enamels will be placed should be depletion gilded until the surface of the joint is silver white. Well, I tried but I couldn’t do it. The merest touch of the flame on the eutectic solder, unprotected by flux, is enough to turn it very dark brown and no amount of time in the pickle would take it off. Even the nuclear option of hydrogen peroxide pickle had little effect! In the end, I just sanded down the joint to the minimum and will hope for the best.
After I cleaned up the circles, I rounded them out on a mandrel as usual. The thin strip is easily formed just with your fingers.
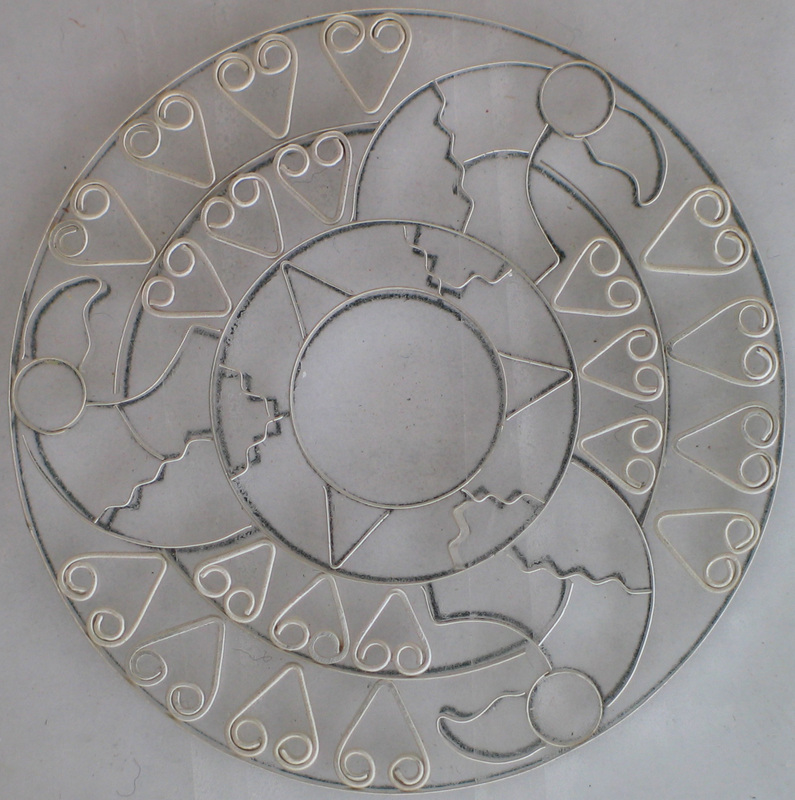
After making all of the components and heart scrolls, I laid it all out (again, as Linda Darty suggests) over the pattern. The pattern is taped to the underside of a piece of clear acrylic and the top of the plastic is coated with a layer of double sided tape. Next time, I’ll probably use the higher tack “permanent” double sided tape and be more careful to make sure the tape doesn’t overlap itself. An uneven surface does not help the small formed bits of strip stay in place!
The next step was to bend up all the little filler scrolls. Nothing too hard about that in principle, but if you want them to turn out the same size, it pays to be very careful to do exactly the same motions with your tools every time.
The next step was to bend up all the little filler scrolls. Nothing too hard about that in principle, but if you want them to turn out the same size, it pays to be very careful to do exactly the same motions with your tools every time.
After the design was laid out, the process moved to very standard cloisonne. Wash enamels, wet pack, fire, pack more, fire more...The Art of Enameling explains this far better than I ever could so I'm not going to waste time trying to do so. Just go buy the book!
I was lucky enough to take a class from Prof. Darty at the Revere Academy in San Francisco right around the time I was working on this piece. So, I decided to make it one of my class projects. I can't recommend Linda's class highly enough. It was great, she is a great teacher, and I learned a lot!
I was lucky enough to take a class from Prof. Darty at the Revere Academy in San Francisco right around the time I was working on this piece. So, I decided to make it one of my class projects. I can't recommend Linda's class highly enough. It was great, she is a great teacher, and I learned a lot!
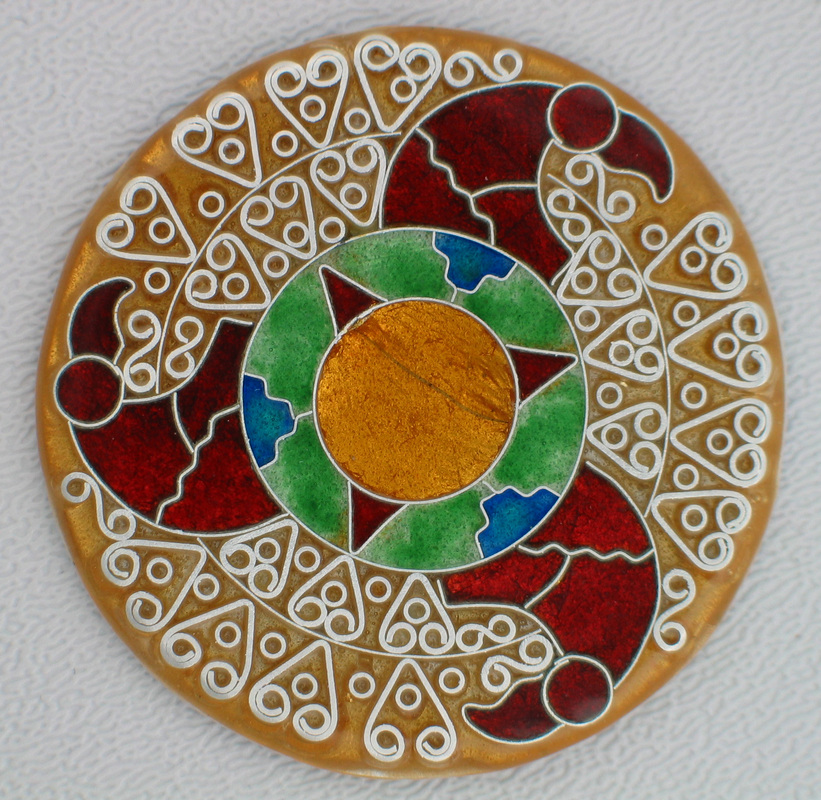
Here's what the project looked like at the end of the workshop.
The birds all have gold foil over flux, then lots of “vintage” Thompson 674 on top, courtesy of Linda’s stash. There is also gold foil under the Nihon Shippo 190 in the center (note the dark line, the edge of a piece of foil that didn’t fire down well). The 190 over flux fills all the scroll work. Blue in the center ring echoes the millefiori on many gold and garnet pieces contemporary with the original. The green is there because Linda convinced me it was the right way to make the red pop. It sure did! It's not her fault that my attempt to shade it just made it look mottled instead.
The tiny circles are very short sections of fine silver tubing. It was kind of tricky to get them to stay upright as the enamel fused, but it all came out okay in the end. You can see that the pieces of tubing have moved around a bit. They all started out in the same place relative to the heart scrolls and long arcs.
A very interesting thing happened on this piece. I didn’t finish this piece in class, and when stoning it down at home I noticed some low spots that I decided to fill. Many of the spots were on the rim. After I filled and fired them, it was very distressing to sit in the studio and listed to the piece “ping” as it cooled.
My days making tile taught me that any sound during cooling was a Bad Thing for the glaze and the same is true here. Note the rim at the extreme bottom of the shot. Part of the glass rim popped off during cooling. I tried refilling it and refiring, to no avail. Maybe all that thick silver wire and the thick glass on the edge was just too much for things to hold together on a flat piece. In the end, I just refired the piece to heal the fractured surface. Hopefully the setting will mostly mask this spot.
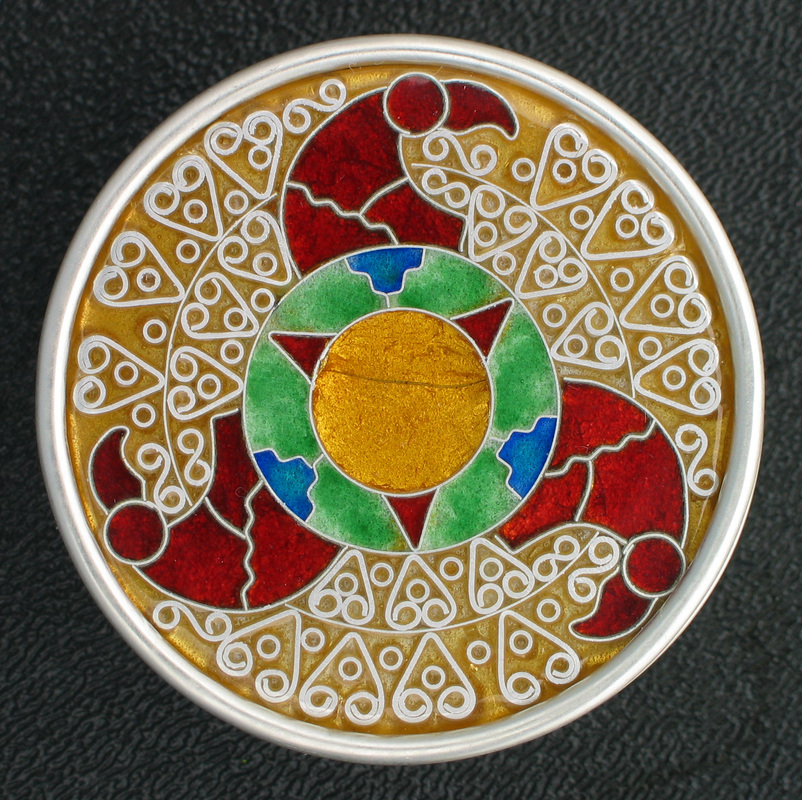
After the enameling was complete, I fabricated a tabbed bezel setting for it based on the painted enamel button project in "The Art of Enameling“. At that point it was clear that it was waaaaaaay to heavy to be a piece of jewelry, not so much by aesthetics as much as by gravity. So, what to do? How about make it into a box…like this one.
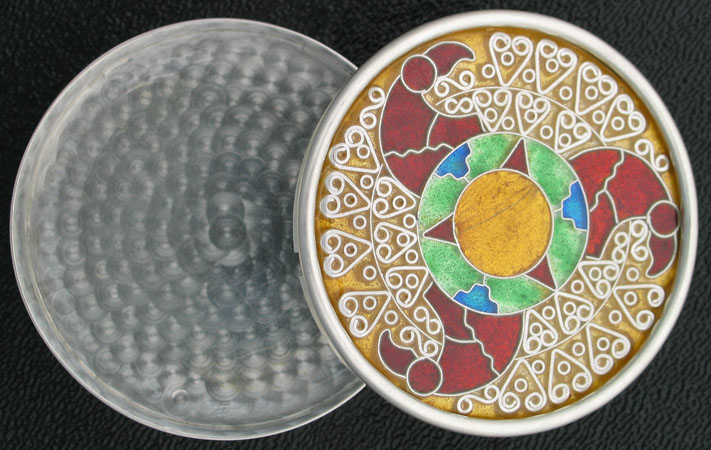
The top is still the tabbed bezel and the bottom is a simple cylinder.
When the time came to polish the interior, I decided to use it as an opportunity to experiment with some rubberized abrasives to see how they could be used to create a decorative pattern. As I was polishing out the side of the box, I touched the broad, flat face of an abrasive cylinder to the bottom of the box where it made a swirl. I was immediately reminded of “engine turning” or “jeweling” I’d seen in the past on watches, jewelry (frequently as guilloché enamels), vehicles, and fancy decorated firearms. Some of these things are crazy complicated patterns.
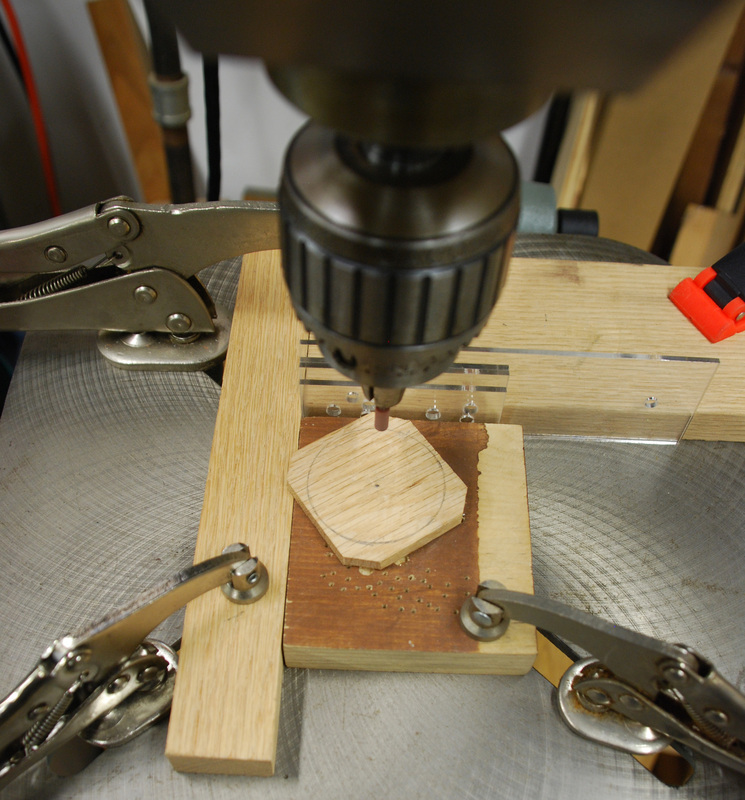
Of course, once I thought of it I had to figure out how to do it in my studio, even if it was only simple swirls. The drill press, a little turntable made from two flat pieces of wood and a nail, some double sticky tape, sticks of wood for guides, and plastic spacers and I was ready to “jewel”. I didn’t have a small, flat ended cylinder abrasive to use, but I did have a bullet shape I filed flat (a little hard on the file!). The setup is shown at left.

Some things I learned/observed about the “jeweling” process:
Lots of ways to make the next project better!
- Don’t press down on the drill press too hard or you will drive the shank of the abrasive right through the tip. Can you spot scar on the bottom?
- Press down with consistent pressure to make spots of the same diameter.
- Clean the tip of the abrasive often or it loads up with silver, causing a fuzzy, indistinct swirl. I ended up doing about five spots before cleaning the tip on a rough cotton towel.
- Put a nice polish on the surfaces before you start…or you end up with unsightly scratches showing through your hard work.
- If you want the ultimate insanely regular pattern, you need to match the diameter of the tip of the abrasive wheel and how far you move the piece between courses of dots.
- Use a nice, smooth rounded punch of some sort to push over the tabs or you get a scar on the tab (and if you slip off the tab and hit the surface you get a scar there, too!).
- It would be nice to figure out a way to shape and soften the ends of the tabs before they are pushed over so that they don’t look so raw. Maybe a thin piece of abrasive paper slipped into the sawn slot and “shoeshined” around the tab a bit?
- A tight fitting backplate would be a good thing.
Lots of ways to make the next project better!

