
|
A few months back, I saw a Craigslist ad for a set of 6 Mitutoyo mechanical outside micrometers from 1" to 6" . At $150 for the set, it was worth a look. The equivalent set purchased new from Amazon is over $700. Ouch! |

image from amazon.com
|
The mics were indeed in good shape, the standards were in fair shape, and the storage boxes were rough (at least on the inside). Most of the mics also still had the zero adjusting wrench.
Since the mics were all the really mattered, I went for it. I knew I could fix the storage boxes and hoped that either the standards could be cleaned up or that I could find new ones for a decent price on eBay.
Since the mics were all the really mattered, I went for it. I knew I could fix the storage boxes and hoped that either the standards could be cleaned up or that I could find new ones for a decent price on eBay.

image of similar foam failure from pharoahaudio.com
|
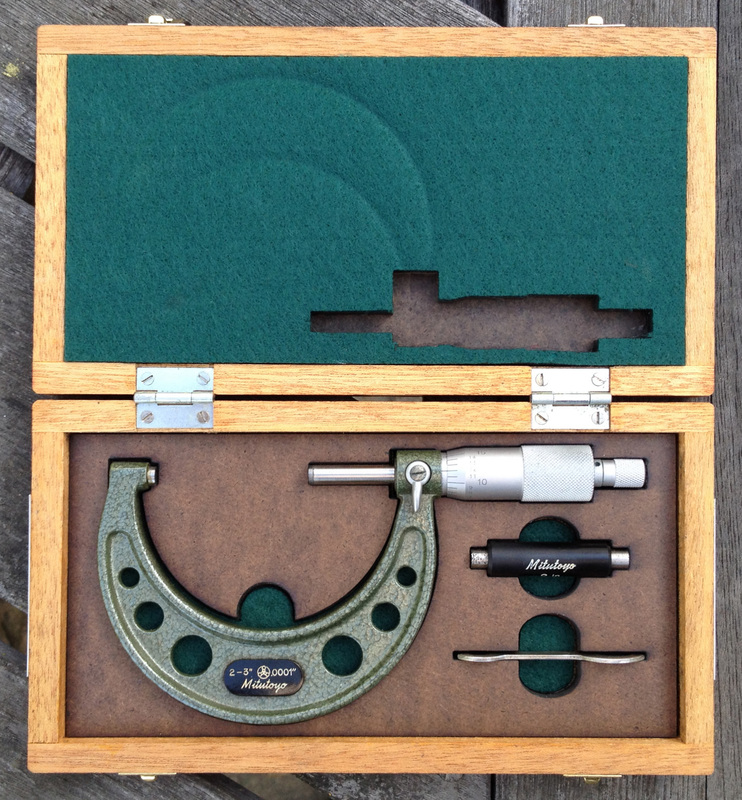
The main issue with the storage boxes was that the open-cell urethane foam padding in all of them had decayed to the point where touching it caused it to crumble and fall apart. The only other problem was that half of the latch for the 2"-3" mic was missing.
Replacing the latch was easy. I had some other small boxes to build, so I ordered a selection of small latches, hinges, and other hardware from Craft Inc. and from Lee Valley. A pair of the smallest square latches from Lee Valley did the trick to replace the single center latch. |

image from leevalley.com

|
I decided to clean out all of the old foam and then evaluate the best way to add something back to protect the mics from rattling around in their boxes. Scraping away the most of the mess was easy with just fingers and a stiff brush.

image from midwayusa.com
|
It was a bit more difficult to remove the parts of the foam where the adhesive was still intact. Even this came off with a little effort using a small bottoming/inletting file I've had kicking around for decades, ever since I assembled & finished a Thompson-Center .50 caliber Hawken rifle kit (a replica of a 19th century black powder muzzleloading rifle) when I was a teenager.
I'm pretty sure I bought the file from Dixie Gun Works. Looks like they sell the same one today. Why I remember this is a mystery, given that I frequently can't remember what I had for lunch yesterday... |

image from dixiegunworks.com
|

image from joann.com
|
I chose green polyester felt for cushioning material. The synthetic material won't tend to absorb and hold moisture out of the air like a natural fiber might but it would still have a traditional look, say like the inside of a Gerstner toolbox.
I found generic green polyester felt about 1/8" (3mm) thick by the yard at Joann Fabrics. It was good that they had it because they are pretty much the only surviving general-purpose fabric store in the SF Bay Area and I wanted to lay eyes on it before buying rather then buying off the internet. |

image from gerstnerusa.com
|

|
To properly protect the tools, I decided to make the felt inlays as form fitting as possible (a sentiment straight out of the "If it's worth doing, it's worth overdoing" playbook!). Since I have access to the Epilog laser engraver/cutter at TechShop San Jose, make precisely fitting inlays was practical.
As I worked through the required shapes, I realized that the 2"-3" and 3"-4" mics had no structure in the box at all, so I also made tempered masonite inserts to stiffen up the lids and locate the mics, standards, and wrenches in the otherwise empty boxes. Then I cut felt inserts to fit the openings in the masonite. |

image from epiloglaser.com
|

2"-3" outline
|
To cut the felt, I needed to know both the outline of the shapes required and the thicknesses required. Since all parts of a mic are not the same thickness, nor are the recesses in the wood boxes the same for the different sizes, each mic and box had to be carefully examined to determine what to cut.
The most common need for a special shape in the felt in the lid was a recess for the barrel of the mic. |

image from amazon.com
|
Felt in the lid as well as the base meant multiple thicknesses of felt.
To create the multiple thicknesses, I laminated the felt using 3M Super 77 spray adhesive. A light coat on both surfaces was enough to hold the felt to itself without anything soaking through to the face of the felt. I probably could have used more to make an even stronger bond, but there aren't really any forces acting on the layers to make them delaminate. |

|
Once I had the basic method figured out, it was just a matter of taking everything to TechShop SJ and cutting away. The 45W Epilog Helix laser cutter/engraver created an excellent cut edge on the felt after I got the settings dialed in. To eliminate any charring or melting back away from the cut, I used multiple low-power cuts for the thicker laminated felt. The settings I used were:
65% speed, 15% power, 3000 Hz 1 layer: 1 pass 2 layers: 3 passes 3 layers: 4 passes |

|
This might seem like a lot of passes, but at 65% speed, vector cutting goes very quickly on these simple outlines.
My outlines and thicknesses weren't perfect on the first try for some of the boxes. Felt is pretty cheap at $5 a yard, so it wasn't a big deal to tweak the outlines and recut as I went.
My outlines and thicknesses weren't perfect on the first try for some of the boxes. Felt is pretty cheap at $5 a yard, so it wasn't a big deal to tweak the outlines and recut as I went.

image from homedepot.com
|
To cut the 1/8" thick tempered masonite for the 2"-3" & 3"-4" mic boxes, I used 10% speed, 90% power, 5000 Hz. The 1/8" stuff is more like 0.100" thick, and it's 1/4" partner is more like 0.200" thick.
The high frequency might seem a little odd for something "wood-like" but there is so much resin in the tempered masonite that it cuts more like plastic. Plastic that chars a lot on the edge, but plastic none the less. It's easy to remove the charring from the edges by rubbing with a cloth or paper towel. The rubbing also burnishes the edge a bit. Tempered masonite is one of my favorite materials to run in the laser, right up there with bamboo. |

|
One final note: the quality of products sold as "tempered hardboard" varies a lot. I've found that the darker brown the material is, the more likely it is to be strong, resist fraying at the edges, and take a good engraving in the laser.
I buy my tempered masonite from a real lumber yard - Pine Cone Lumber in Sunnyvale. The quality there has always been good and the people there actually know things about what they sell. |

image from amazon.com
|
I used another shop favorite to glue the felt into the boxes: Beacon Fabri-tac. It's a very fast drying adhesive that stays flexible after drying. According to the MSDS, it's >75% acetone, so the balance is likely a polymer resin that hardens up as the acetone evaporates.
Inhaling acetone vapors is a Bad Thing, so I only use this material in well ventilated areas. If you don't know how to work with hazardous materials safely, don't work with them at all. |
| ||
|
Box rehab done!

|

|


|
I cleaned up the standards as well as I could without working the actual reference ends beyond cleaning off any obvious dirt. There are a few pits in some of them, but overall they aren't too bad.
I'll keep my eyes open for some replacements for the worst of them. Buying them new is a non-starter. The set from MSC is $134, almost as much as I paid for all the mics! |

image from mscdirect.com
|

image from amazon.com
|
The final step was to insure that the mics would stay free of corrosion in the future. I put a small cloth bag of silica gel desiccant in each box where there was space to do so. The open weave cloth should allow any moisture in the boxes to be absorbed into the silica gel.
I used an "indicating" silica gel that changes color from orange to green when it is full of moisture. I just need to make sure that I change out the desiccant bags when they are spent. This kind of silica get can be regenerated by simply placing it in a 250 F (120 C) oven for about 2 hours. It will turn back to orange when it's dried out and ready to reuse. I don't now how many cycles the gel is good for, but the 1 gallon jar of the stuff I bought from Amazon should last for a long time. |

image from amazon.com
|
