|
|
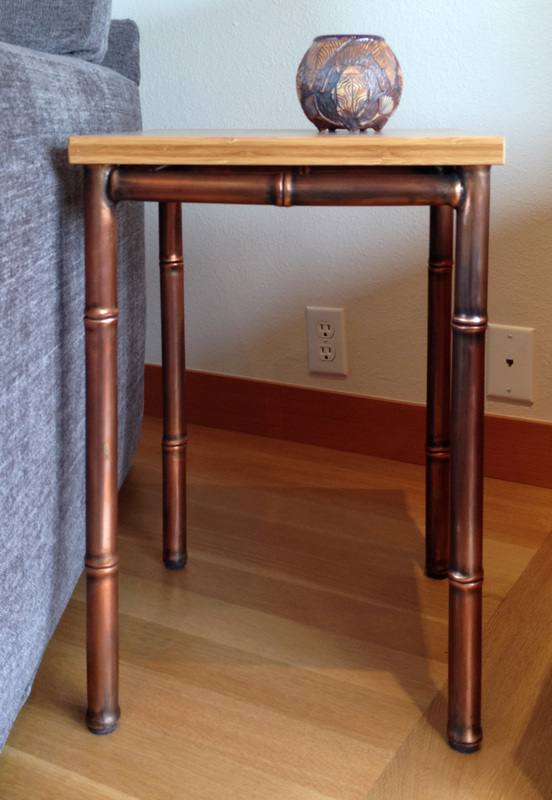
Copper Bamboo Side Table
15" x 15" x 22" 1" Copper pipe Solid bamboo top Commercial hardware fabricated (brazed) (cool pot not included) |
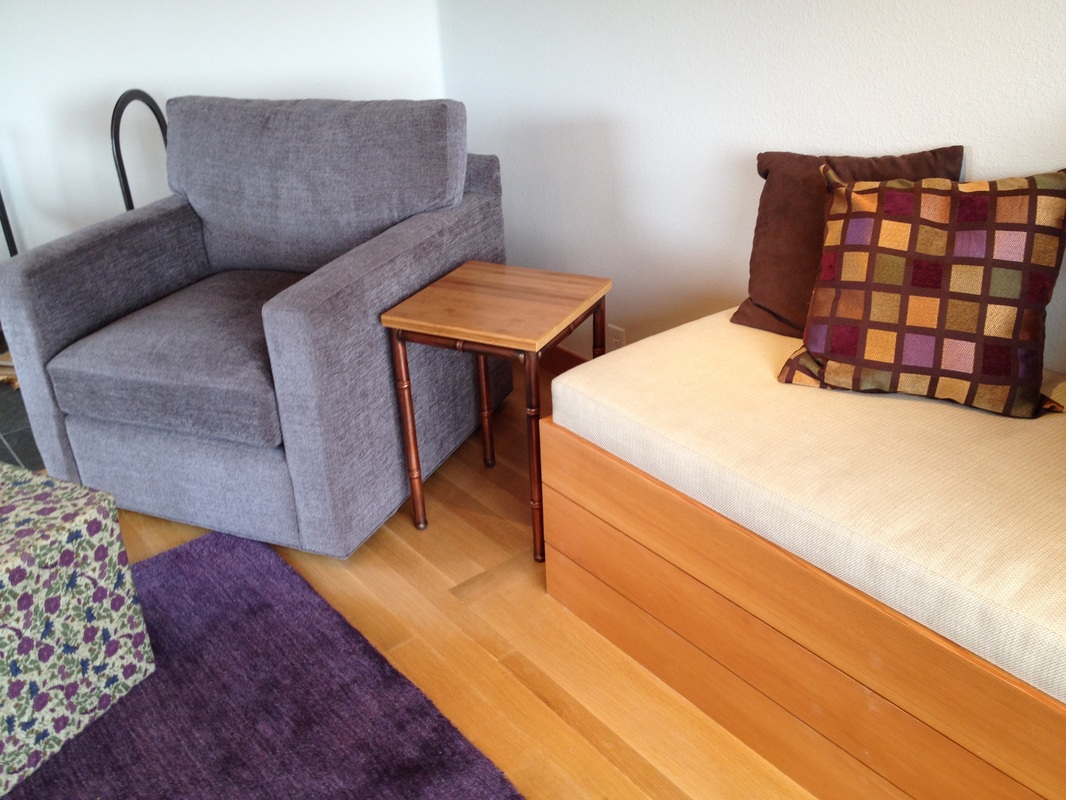
The living room in the The Sea Ranch house needed a small side table, so I decided to put my newly learned brazed copper fabrication skills to use and make one.

|
Let me stop here and put in another plug for taking a copper fabrication class from David Burns at Copper Gardens. (Check out the Basic Copper Fabrication - Gingko Sprig project for a lot more about David and his workshops.)
David is a true artist-craftsman, an excellent teacher, and he and his wife Annie were gracious hosts for the day I spent with them. Rough and Ready, CA (I kid you not, that's where David lives) is a bit off the beaten path but if you want to learn a lot about working with copper in a short time, I can't think of a better way to do it than making the trek to David's workshop. |
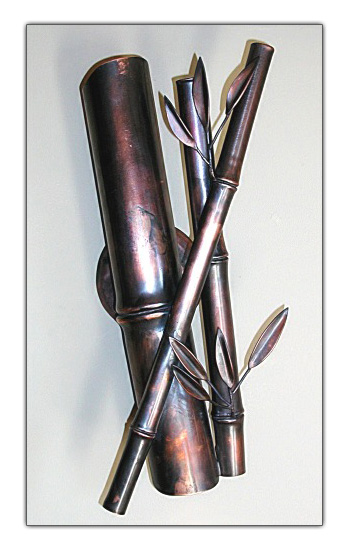
image from coppergardens.com
|
One of David's signature styles is bamboo made from copper pipe and tubing. David is very generous with his knowledge and has uploaded at least four different videos to his youtube channel that show different aspects of making copper bamboo. If you are even a little interested in trying this for yourself, step one should be to binge watch them all. Step two would, of course, be to go to David's workshop and learn directly from him.
I thought I'd try my hand copper bamboo and see how it went, hoping that it would at least be recognizable as bamboo at the end. I think I accomplished that. |
|
|
|
|
|
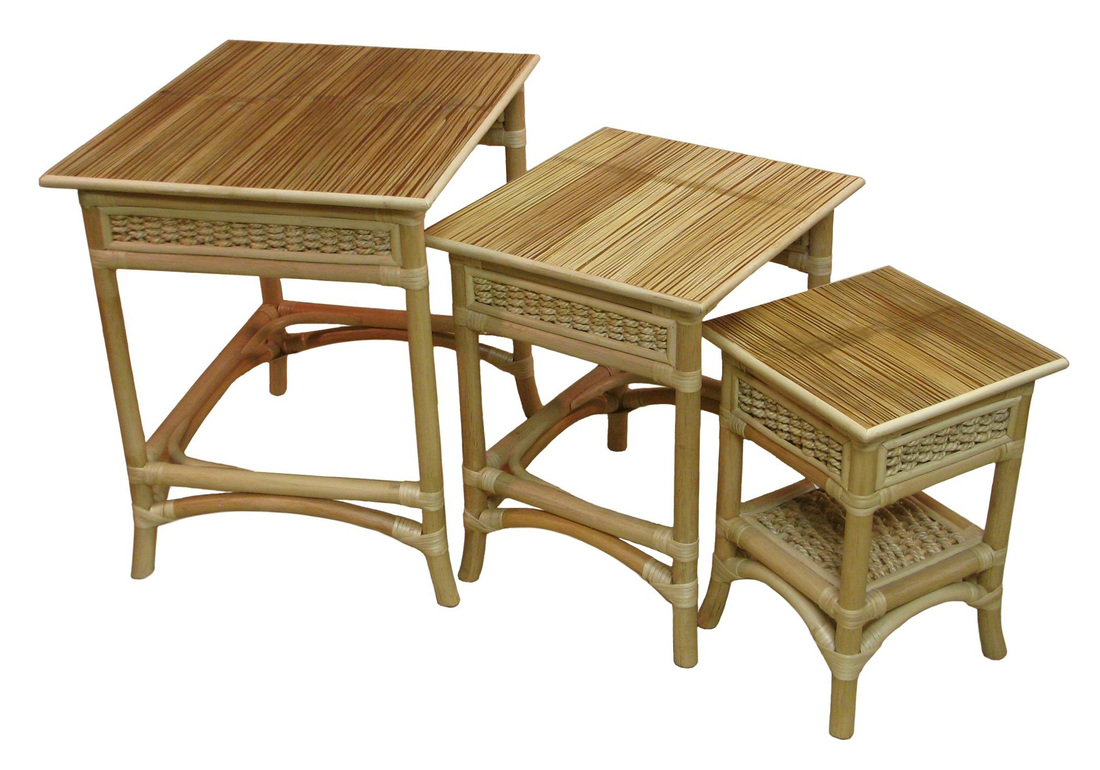
image from wayfair.com
|
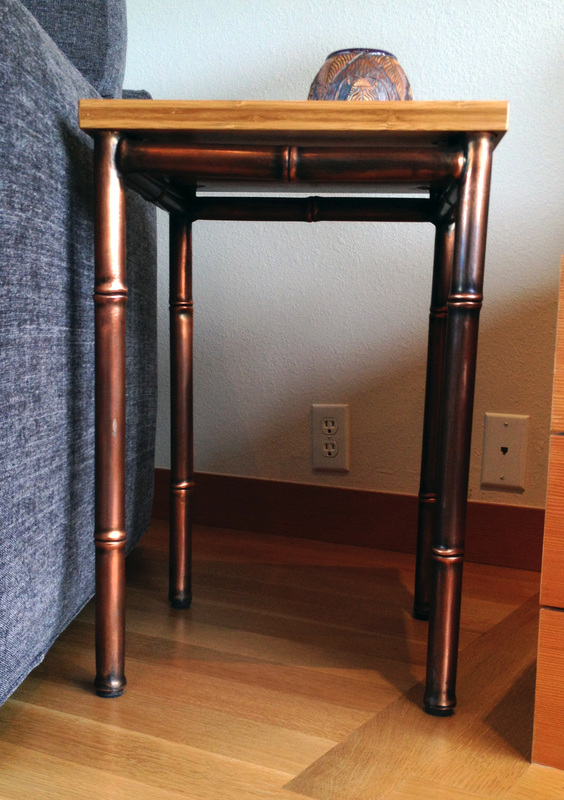
The table design echos the bamboo and rattan furniture of the 60s and 70s....which you can still buy today.
No joints wrapped in wire to mimic the split rattan wrapping in the originals. That would be taking the homage a little too far. Besides, the brazed joints better be plenty strong enough to hold a book, a mug of tea, and maybe the odd piece of pottery. Overall dimensions were just sort of made up by looking at the height of the chair the table would sit next to and then making a frame that was wide/long enough that it would be stable at that height. In the end, the dimensions came out as 15" wide, 15" deep, and 22" high. |
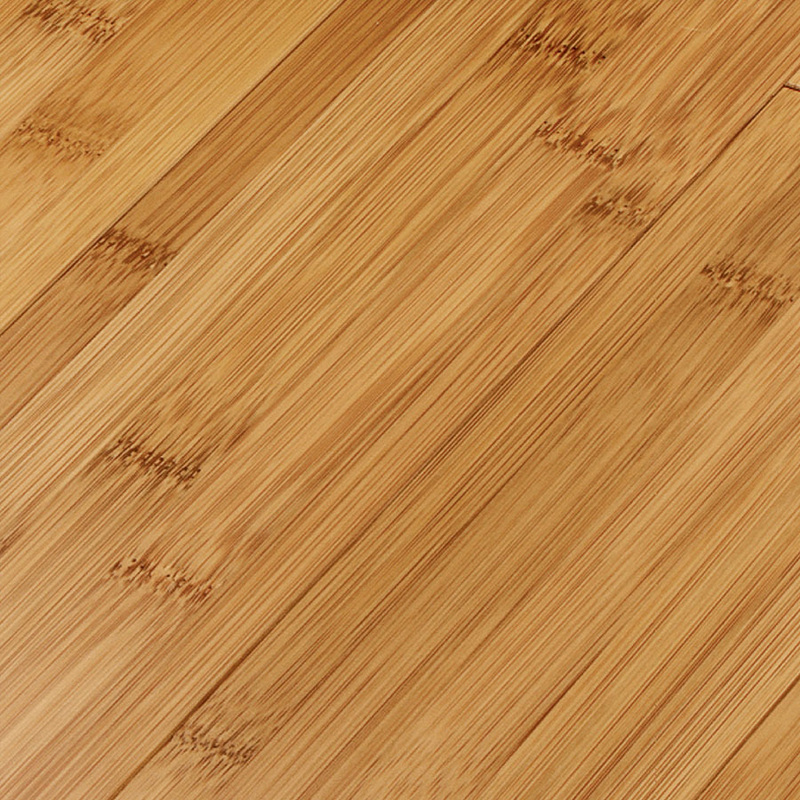
image from lowes.com
|
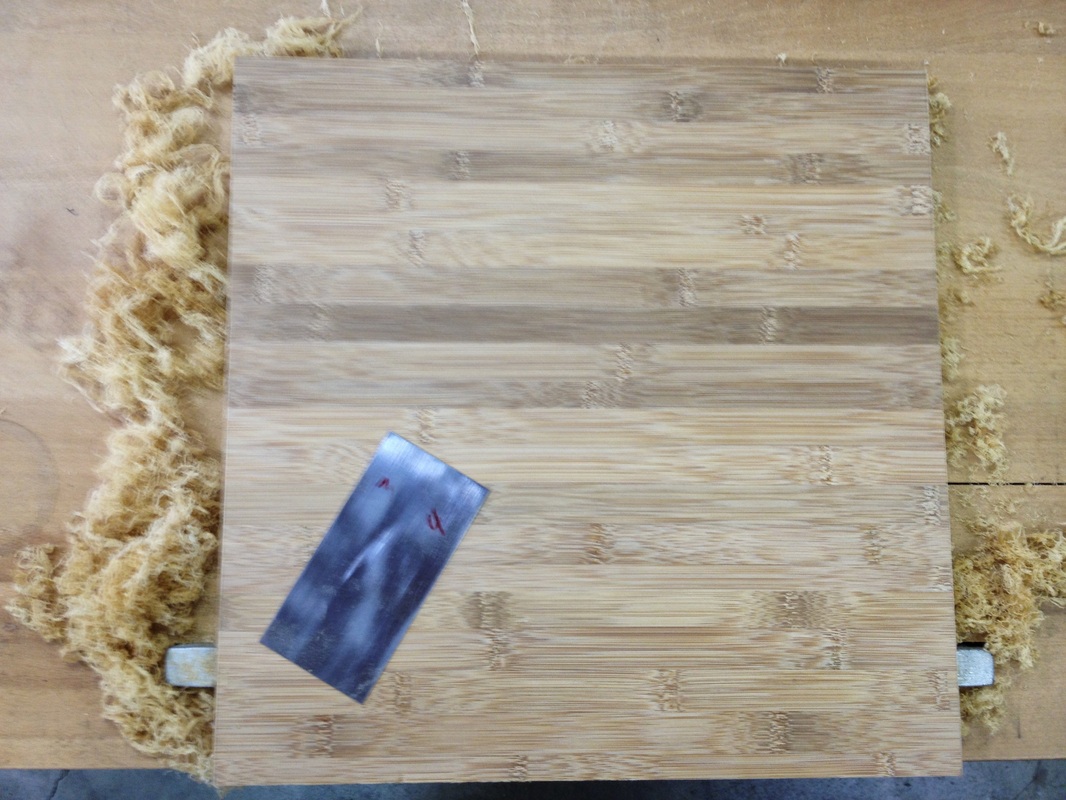
The choice for the top was obvious: real bamboo to go with the copper bamboo frame.
The top started out life as ~3" wide planks of solid bamboo flooring from Lowes. I edge glued enough planks to make a top about 16" x 16", ran them lightly through the thickness planer at TechShop San Jose to cut off the floor finish, and then face laminated them together to build the thickness to about 1". The rest of the top fabrication had to wait until the copper bamboo frame was completed to insure the top dimensions came out exactly right. |
|
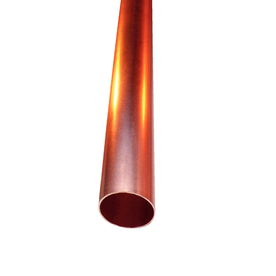
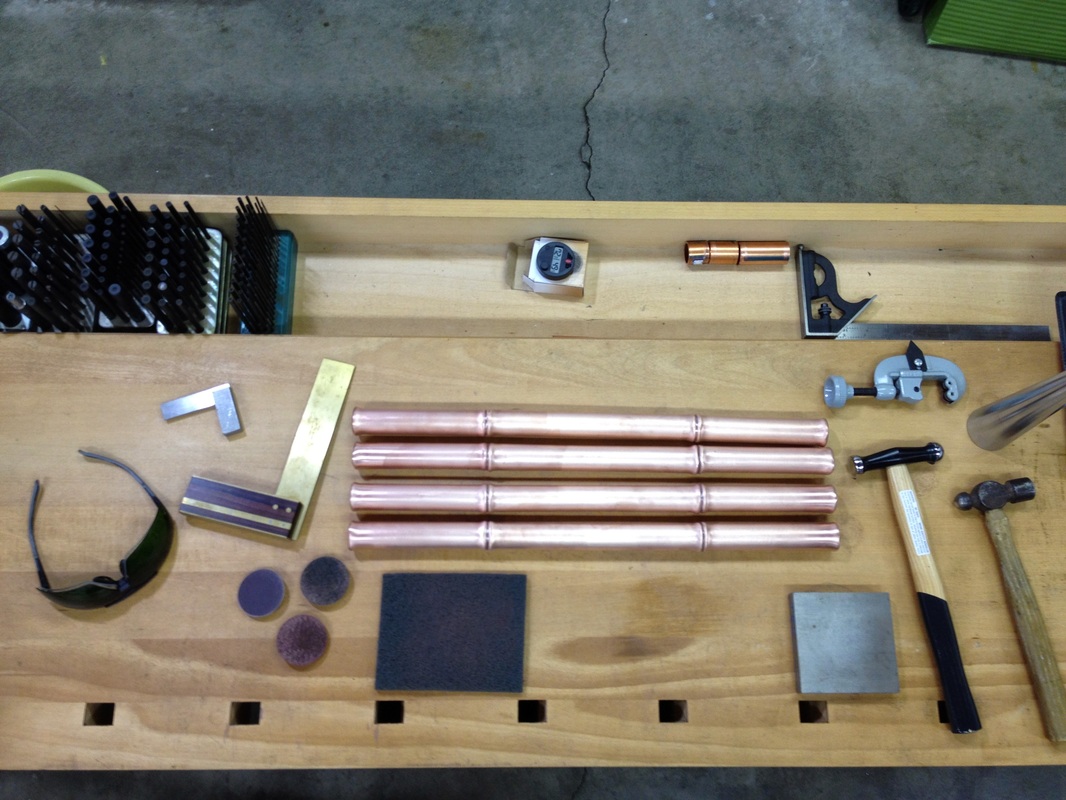
All of the parts for the frame were made from Type L 1" copper plumbing pipe, again purchased at Lowes. Using the thicker Type L sounded like a good idea when I was designing the table, but it did make the fabrication a bit more difficult.
If I had it to do over again, I'd probably use the thinner (and thus lighter and less expensive) Type M pipe. |
|
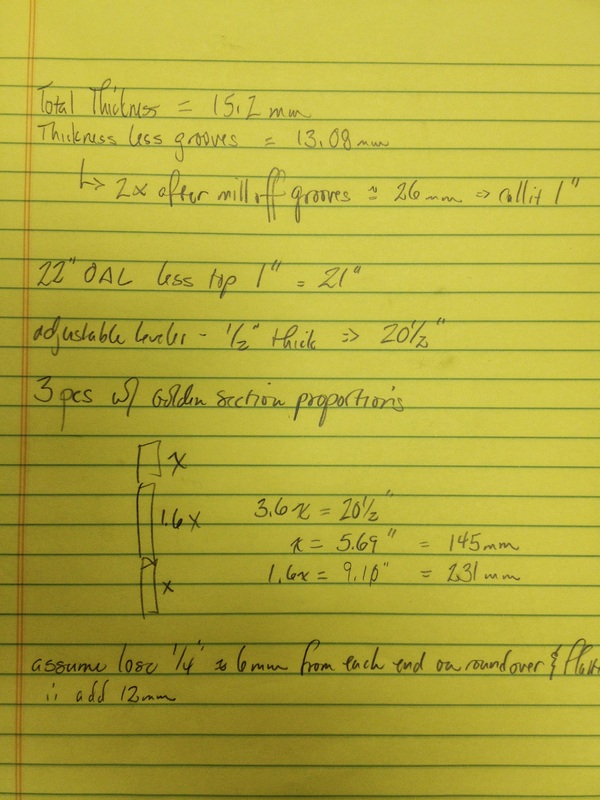
Time to cut some pipe. The legs were split into three sections each using the golden ratio. Short pieces are X long, long piece is 1.6X long, total length is thus 2.6X, solve for X. Yay algebra!
The stretchers were too short to split into three sections, so I just split them in half. Not ideal, aesthetically, but what are you going to do? |
|
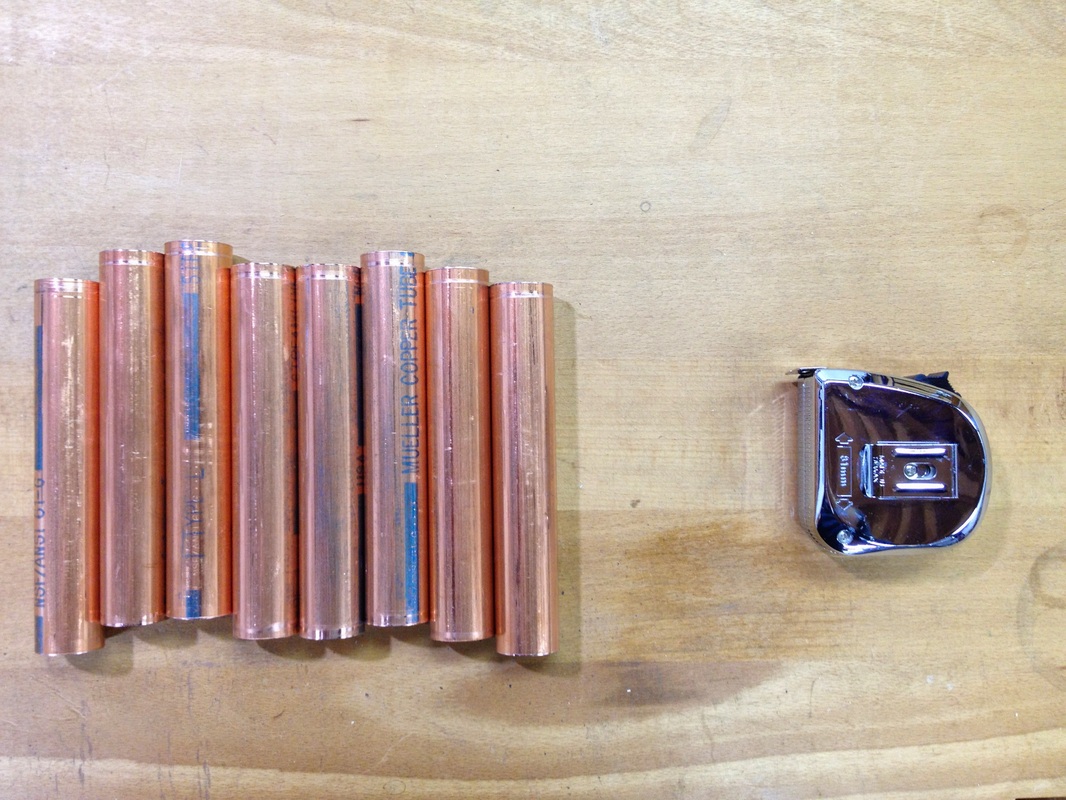
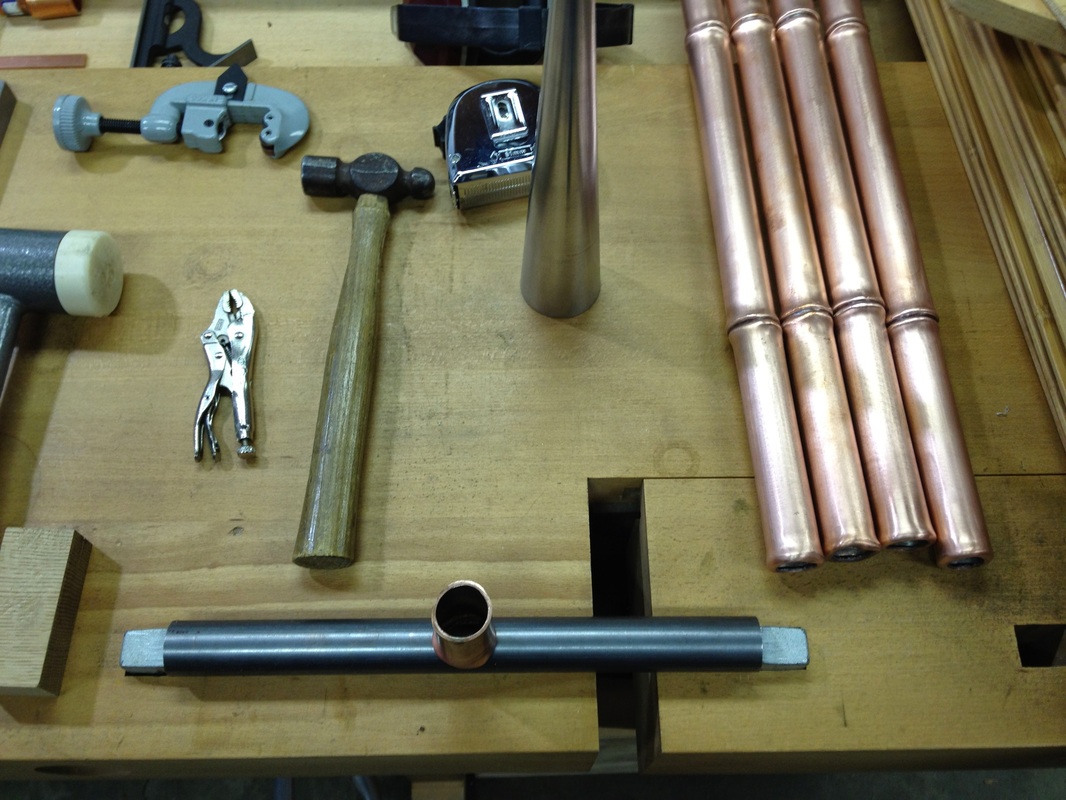
Blanks were cut from a length of pipe with a standard plumber's copper tube/pipe cutter. Each piece had 1/4" of length added to both ends to make up for the length folded over into the joints. The exact amount wasn't important as long as they were all the same.
|
|
The pipe cutter also caused the pipe to neck down slightly at each end. To flare it back out, a jeweler's bracelet mandrel was used. The sections were slipped over the end of the mandrel and hammered down a bit with a dead blow mallet until the end of the copper was approximately the original diameter.
To make the forming process as easy as possible, I annealed all of the ends of the pipe sections to soften the metal. See the section about fire below. |
|
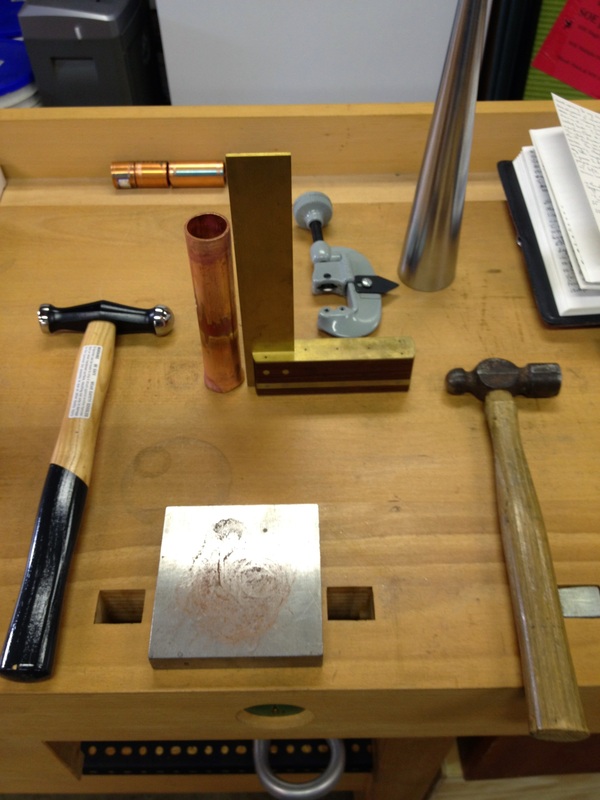
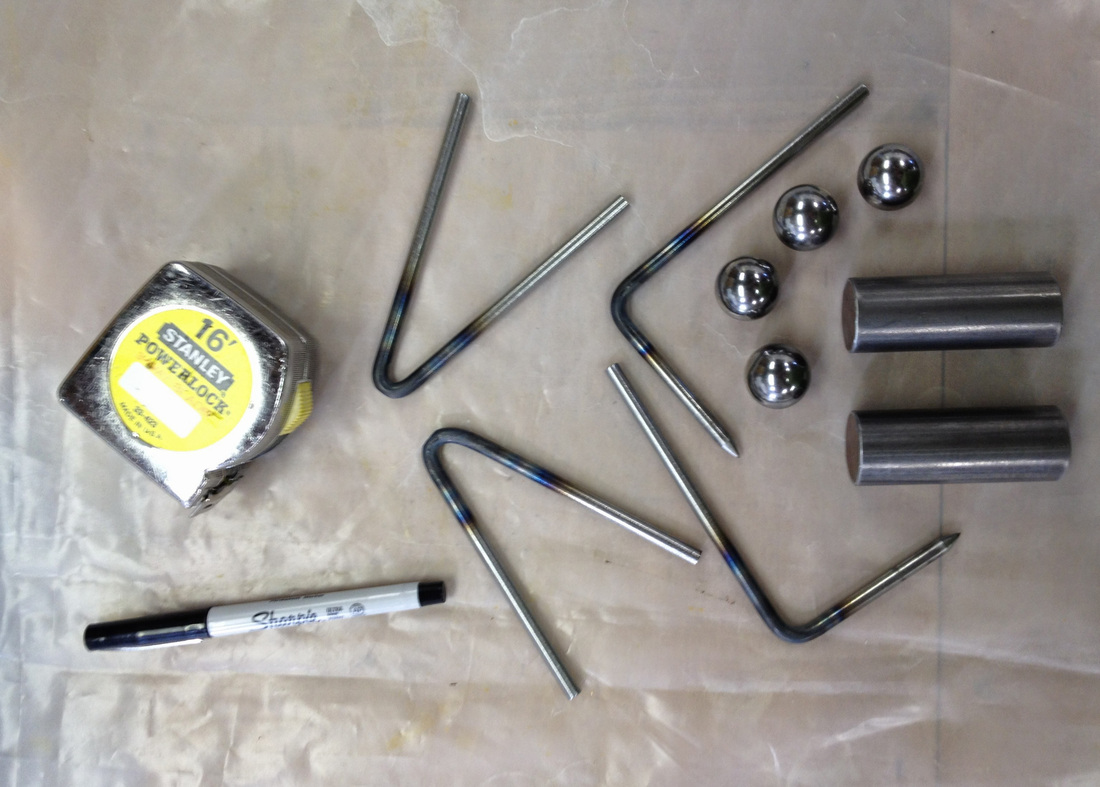
Before actual fabrication of the bamboo joints could begin, a special mandrel of the type David shows in his videos was made from a piece of 1/2" drill rod that was kicking around the shop. No rocket science to forming the mandrel. David's video is quite clear about what it needs to look like and some aggressive use of the bench grinder, tidying up with a smooth file, and finishing with emery cloth was all it took to get there.
|
|
A recent addition to the shop came in very handy during the shaping of the bamboo joints on the ends of the sections of pipe. The Bonny Doon vertical vise was designed to hold various kinds of tooling horizontally for jewelry making and worked perfectly for holding the mandrel used here.
Fancy vice, but just about the un-fanciest hammer ever. Bought at the Friends of the Oakland Museum White Elephant Sale for two bucks many years ago. I have many of more expensive hammers (although my hammer problem is nowhere near as severe as Tom Lipton's!), but I find myself using this one more than just about any other. |
|
|
Hammer time! (Do any of you whippersnappers even get that reference?)
David's videos do a great job of showing how to form the bamboo joints using a hammer and the special mandrel, so it would be a waste of time to do so again here. Just go watch the videos again. |
|
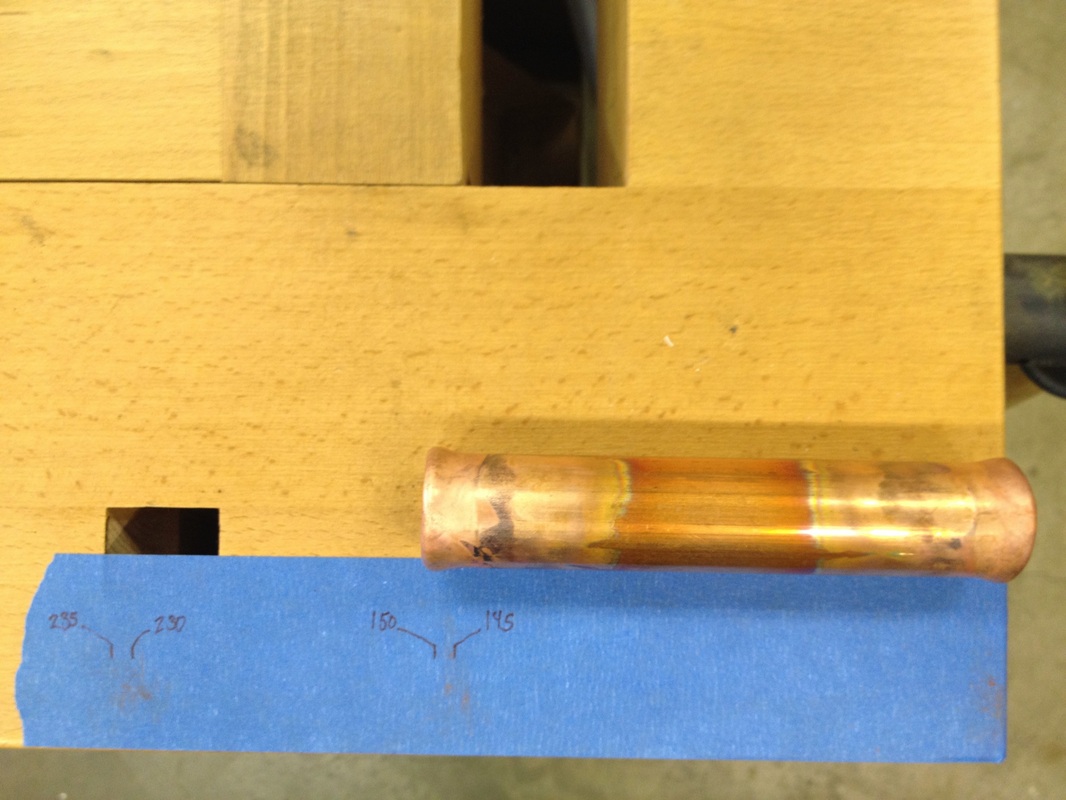
Since it's kind of important for the legs of a table to come out the same size, a little measuring gauge was made from a piece of blue tape stuck to the edge of the workbench.
The gauge was marked with the lengths of each of the components, with one and then both of the joints formed. |
|
|
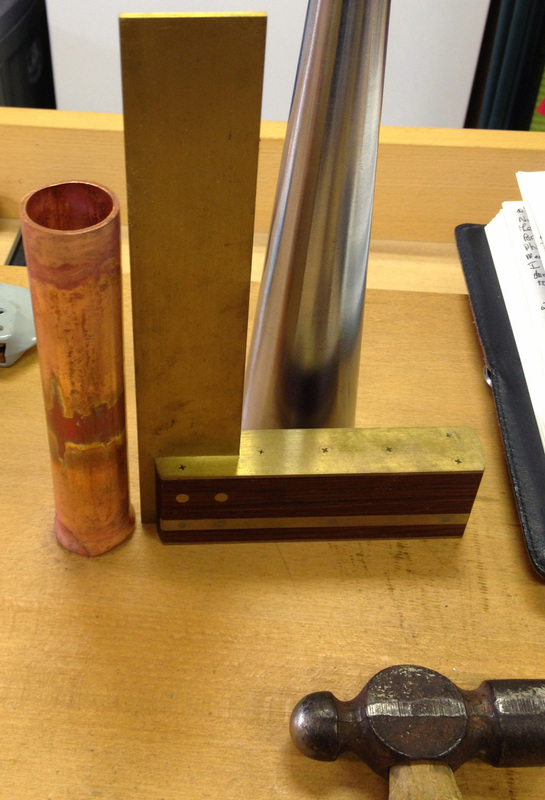
After forming the ends of each section, I adjusted them a bit with a forming hammer and a steel bench block. The goal was to get all of the ends as flat as possible and make them square to the length of the section.
Using a try square resting on the bench worked well for gauging when the ends were flat and square. I had to remember to rotate each one and check it all the way around the circumference to be sure it was even. Check out the copper transferred to the bench block. I swear I wasn't whaling on these things. Maybe a lot of it is junk from the annealing. |
|

|
Now for the really fun part....fire!
With all the initial forming complete, it was time to do the first round of brazing. As shown in David's videos, the proper torch for this kind of work is an oxy/acetylene rig. Copper is such an amazing heat conductor that only oxy/acetylene has the oomph to get things hot enough. A torch like this can do permanent damage to various parts of your body almost instantly. If you don't know how to work safely with hazardous equipment like this torch, don't use one. WEAR PROPER EYE PROTECTION WHILE BRAZING! |

image from airgas.com
|
The brazing rod used here was the one David recommends: Harris 0, a silver-free copper based brazing rod that has enough phosphorus in it to make it "self fluxing", meaning that no additional flux is required to protect the metal or the rod during brazing.
I found the Harris 0 on eBay for about $10/lb delivered. Retail the stuff goes for over $15+shipping, so I bought 10 lbs. I hope it's not a lifetime supply, because that would mean I didn't manage to spend enough time in the shop! WEAR PROPER EYE PROTECTION WHILE BRAZING! |
|
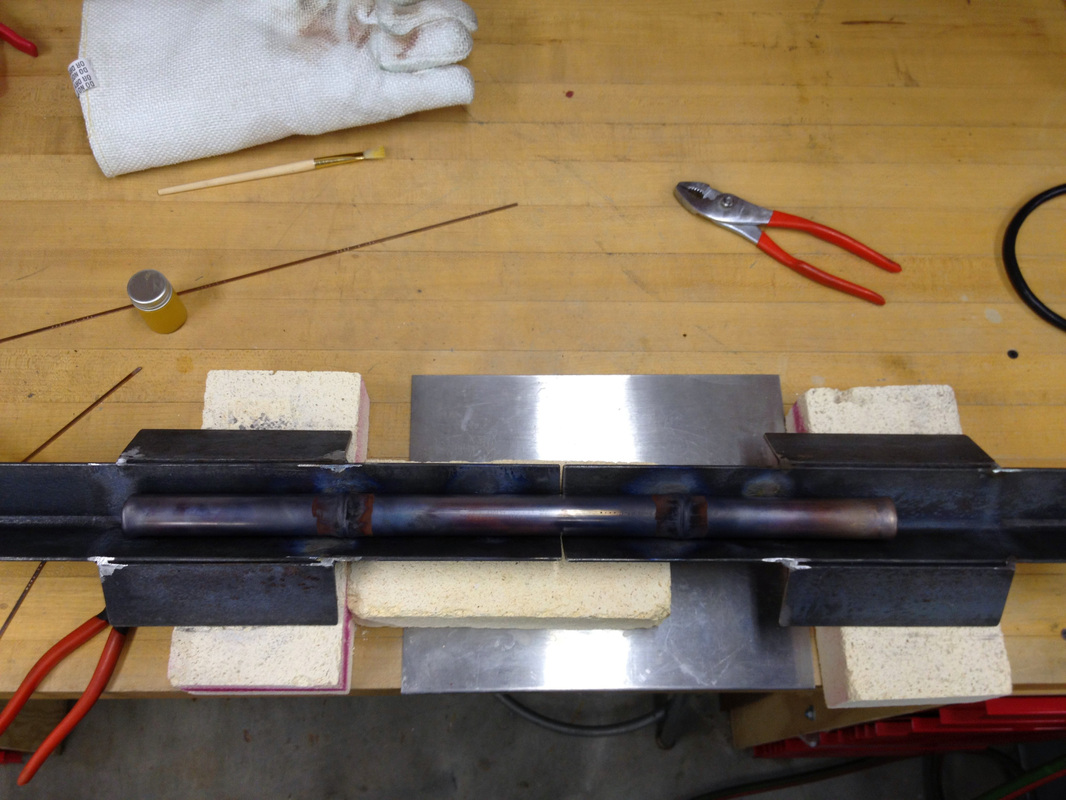
In his copper fabrication class, David introduced a simple jig to help line up cylindrical parts for brazing. It consists of some 2" mild steel angle cut and welded to form a cradle. For long pieces, a couple of cradles can be set up end to end.
The cradle was among my earliest MIG welding projects and the workmanship reflects that. You know you need to work on your welding skills when the clean up time with an angle grinder far exceeds the welding time. To assemble each leg or stretcher, the three sections were laid into the brazing cradle and then clocked to make the best possible fit. Best was defined as resulting in the straightest final assembly with the smallest gaps between the segments. Various bit of copper and brass were used as shims to keep things aligned during brazing while leaving both hands free to wield torch and brazing rod. WEAR PROPER EYE PROTECTION WHILE BRAZING! |
|
Brazing was straightforward, again as demonstrated in David's videos. One thing that became obvious early on is that it pays to keep the brazing metal as contained inside the joints as possible. Otherwise, the cleanup time will easily exceed the brazing time (see above re: MIG welding).
In case if forgot to say it before, WEAR PROPER EYE PROTECTION WHILE BRAZING! |
|
|
|
As the brazing proceeded and the issue of containing the braze metal to the joints became more and more obvious, it occurred to me that maybe the same kind of anti-flux used by jewelers while brazing (usually just called soldering or silver soldering) might work here.
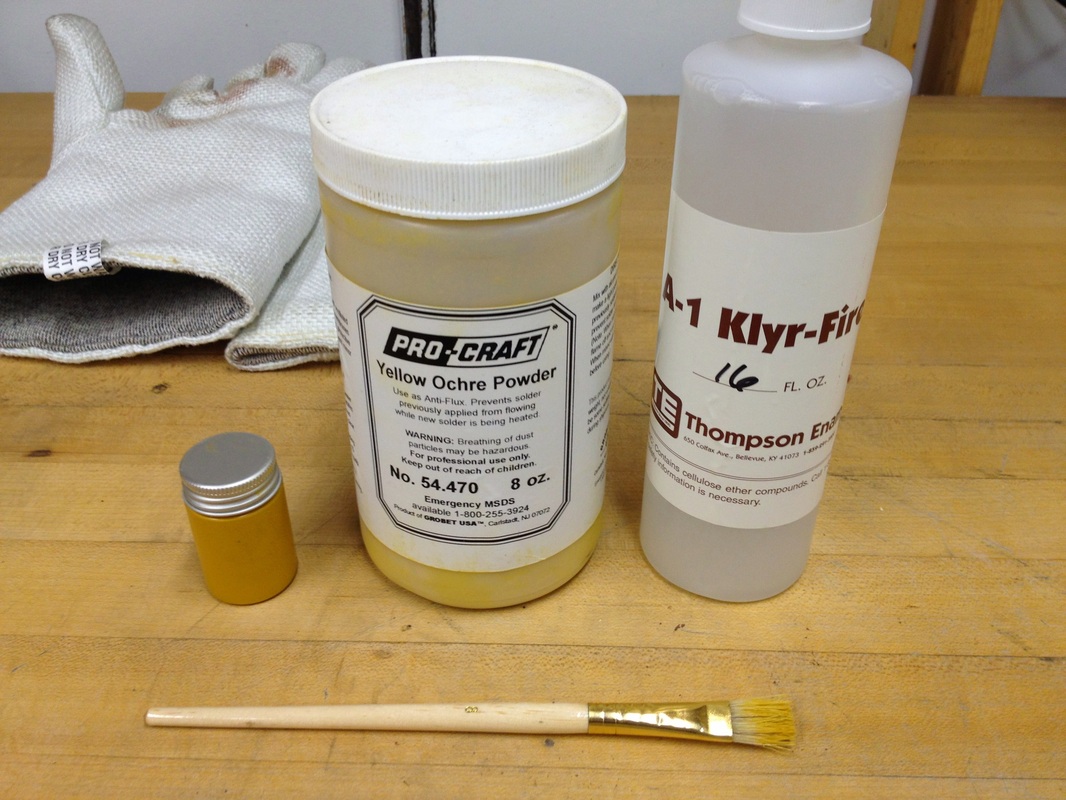
Jewelers use an anti-flux to prevent solder from flowing where its not supposed to go. It's essentially a process of dirtying up the metal so the solder won't stick. That's the opposite of the usual function of a flux: to keep the metal clean while it's being soldered. Hence the term "anti-flux". Yellow ochre is a classic jeweler's anti-flux. It's just finely ground up, fancy dirt. |
|
I mixed up a thin slurry of yellow ochre, water, and a little Klyr-Fire gum binder. The slurry was brushed on adjacent to both sides of a joints. When these joints were brazed, the anti-flux drastically reduced the amount of the braze metal that wicked up and out of the joints. Score one for technology transfer between crafts. The black crust from the yellow ochre & binder came off easily.
The anti-flux isn't a magic bullet. If the braze metal is glopped directly onto it or an adjacent area is flooded too thickly, the anti-flux won't save you. But at that point, you're only getting what you deserve. |
It was very cool to be able to repay some of David's generosity by sending him a sample of anti-flux to play with. He was unaware of the use of anti-flux in jewelry making and I hope he finds the technique useful in his work as well.
|
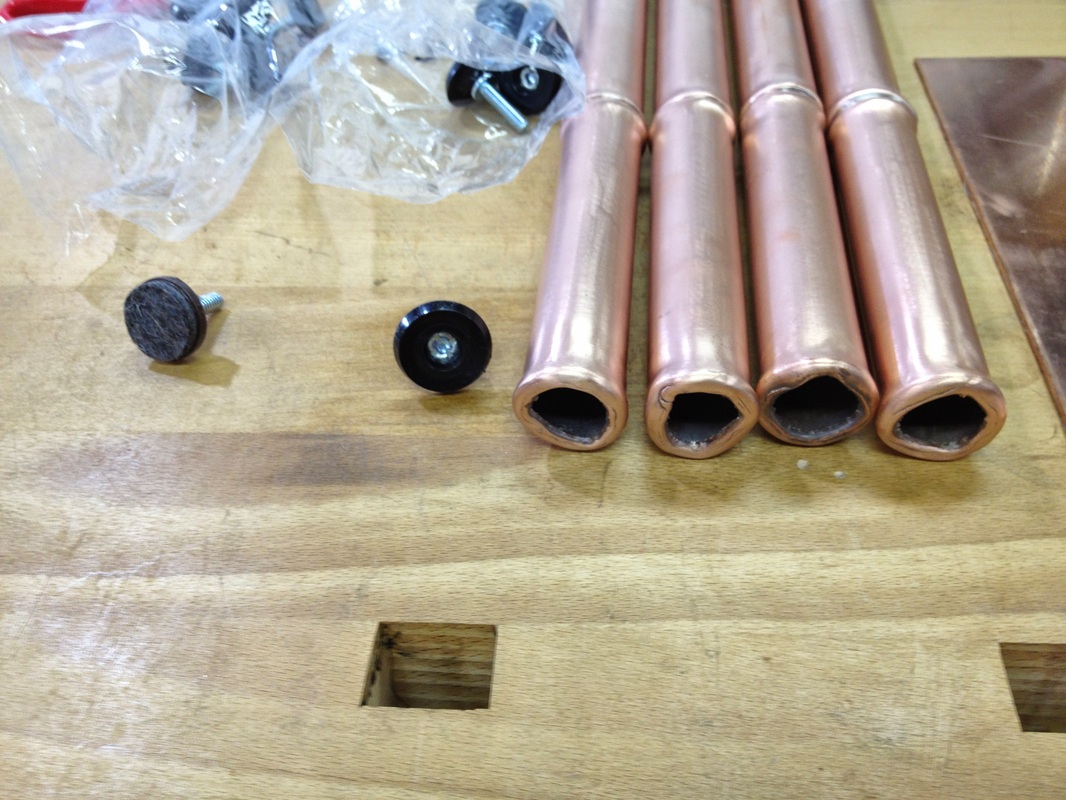
After assembling the legs, it became clear that getting all four of them to be exactly the same length (to keep the table from rocking) was going to be very difficult. Also, the table would sit on a wood floor, so some kind of non-scratching foot would be a good thing.
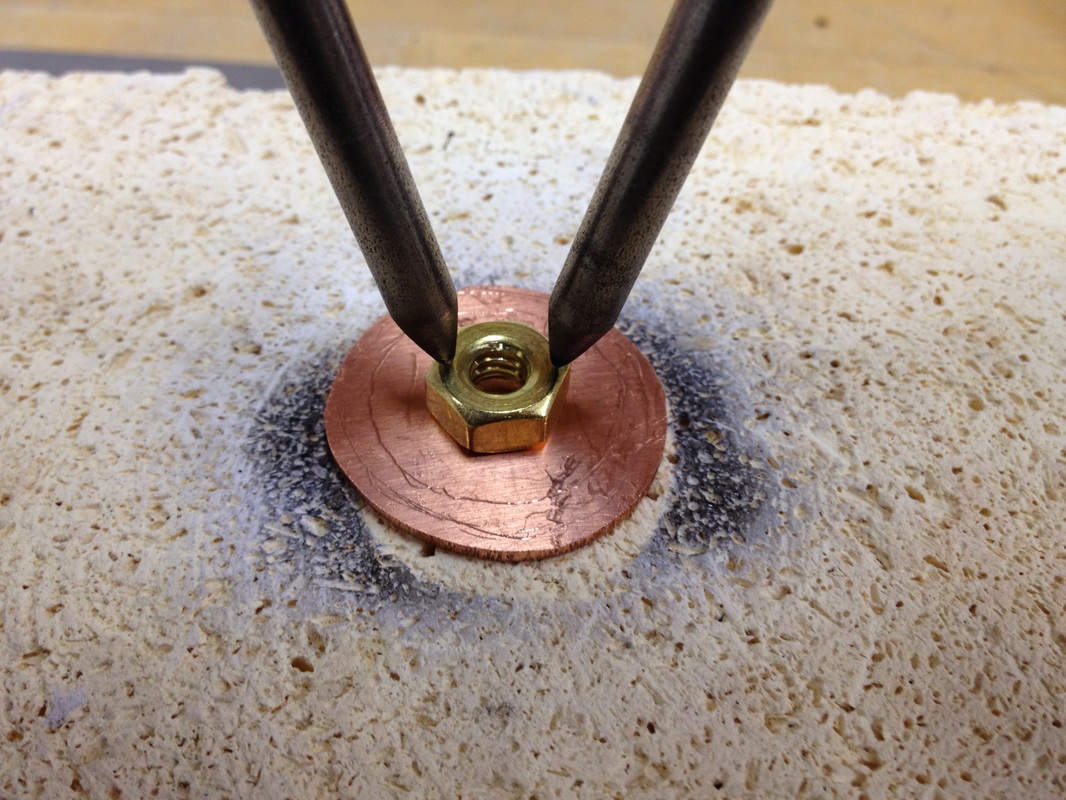
The solution was commercial adjustable feet with felt pads on the bottoms. The feet have 1/4-20 threaded stems, so the legs needed a matching female thread. The easiest way to make those was to use brass 1/4-20 nuts brazed to flat plates, which were themselves then brazed to the bottom of the legs. |
|
After assembling the legs, it became clear that getting all four of them to be exactly the same length (to keep the table from rocking) was going to be very difficult. Also, the table would sit on a wood floor, so some kind of non-scratching foot would be a good thing. The solution was commercial adjustable feet with felt pads on the bottoms. The feet have 1/4-20 threaded stems, so the legs needed a matching female thread. The easiest way to make those was to use brass 1/4-20 nuts brazed to flat plates, which were themselves then brazed to the bottom of the legs.
The plates were sawn from the thick copper with a jeweler's saw and the outer profiles shaped to match the shape of the leg to which they would be attached with files and sanding sticks. |
|
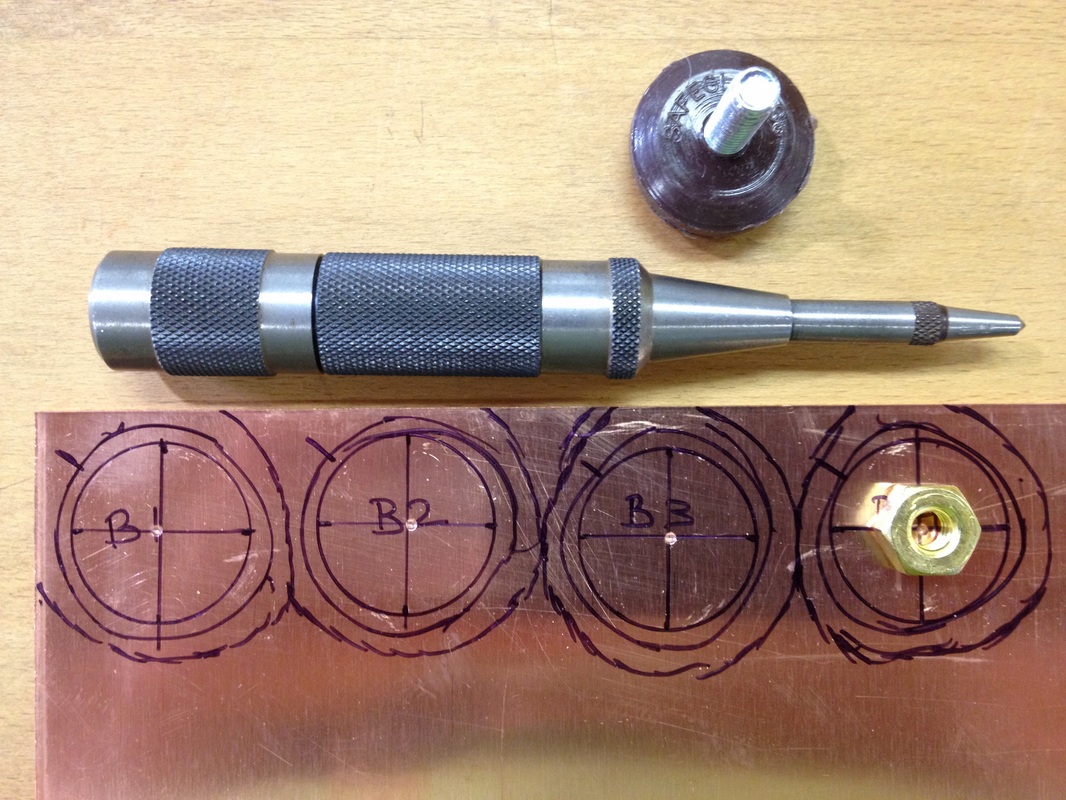
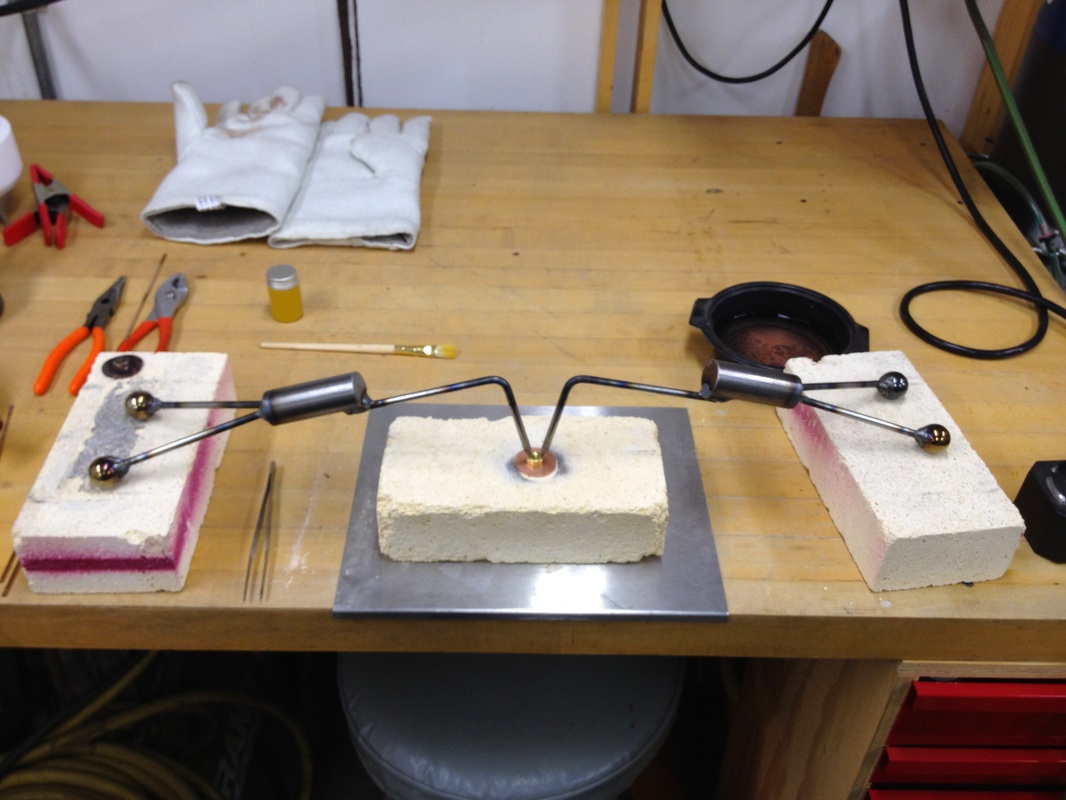
Brazing the nuts on required another pair of jigs called "welder's fingers." These are (relatively) heavy hold downs made from steel that are used to keep small pieces aligned while they are tack welded together. These welder's fingers were made mostly from mild steel round bar (1" for the center weight and 3/8" for the actual finger and legs). To insure that the fingers sat level on any surface, the legs were finished using steel balls purchased from McMaster.
|
|
The welding fingers worked great and all four "nut plates" were brazed up...without getting any braze metal into the threads! Maybe it is possible to control this process after all.
It wouldn't have been a total disaster if a little braze had gotten on the threads. I could have just chased the threads with a tap. |
|
|
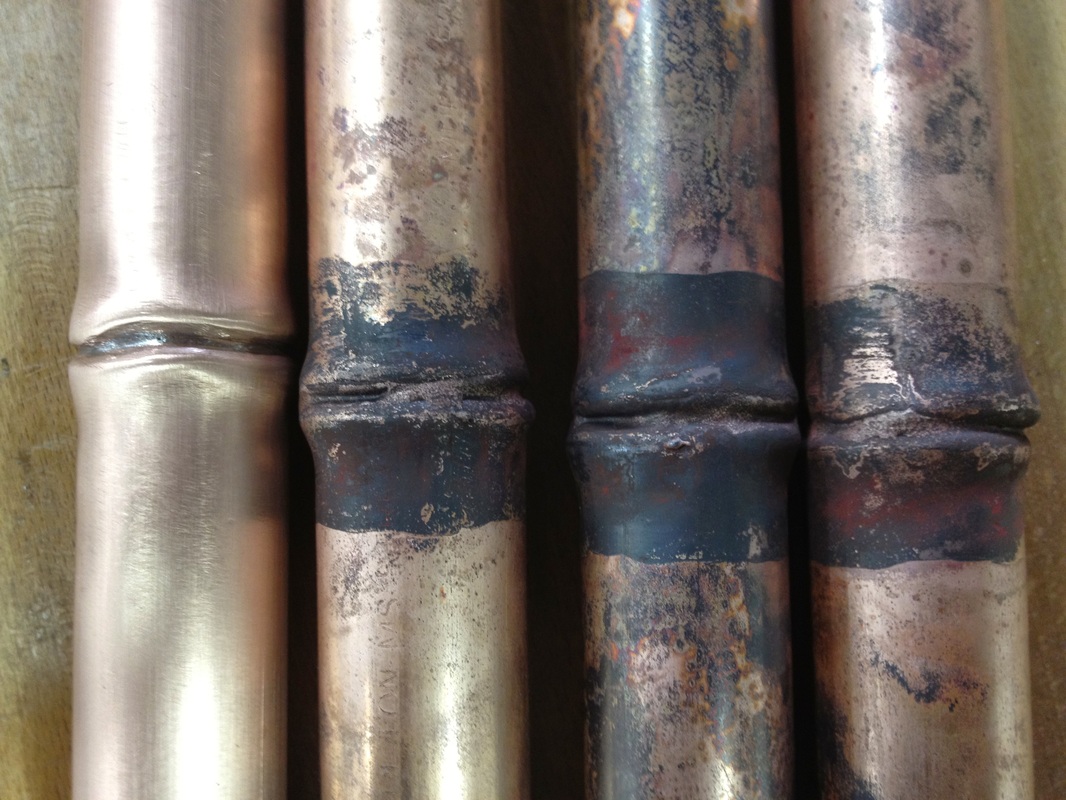
After the brazing was complete on all of the leg and stretcher pieces, David's finishing process was used to clean up all the firescale and braze metal that had crept of the the joints.
David's process starts with an 60-80 grit abrasive disc on an air die grinder to do most of the work. After surfaces were all clean, a Medium red non-woven abrasive disc (generic version of a 3M Scotchbrite disc on a rol-loc mandrel) was put on the die grinder and the scratches from the 60-80 grit abrasive were removed. Finally, a different sort of non-woven finishing disc was mounted in the angle grinder and the surfaces were given what could have been their final finish. It wasn't, because there was more brazing to do to assemble the frame. It still made sense to clean up the individual pieces as much as possible while they were apart because it would be much harder to get to all of the surfaces surfaces when the pieces were all fully assembled. |
|
The next step was to form the ends of the stretchers to conform to the curved surfaces of the legs. The stretchers were attached to the legs below the half joint at the top of the leg to make it possible to fit them closely to the curve. Also, having the stretchers set down a bit from the underside of the table top made the stretchers more visible. After all that work making them, it seemed like a good idea to be able to actually see them.
It didn't seem like a good idea to use the legs themselves or even a scrap section of the copper pipe as a former to shape the ends. The copper is just too soft. Instead, a piece of 1 1/8" mild steel round bar was ordered from onlinemetals.com. The actual diameter of 1" copper pipe is 1 1/8", so the steel bar made a good form. To be enable both ends to be formed simultaneously, a short length of the steel bar was cut off using the big horizontal bandsaw at TechShop SJ. It took a bit of thought to figure out how to get the curves in both ends of a stretcher clocked in the same position. The end vise and bench dog holes in the woodworking bench worked well in the end. With the bench dogs pulled to engage the centerline of the steel bar formers, the leg was clamped between the formers with both formers leveled to make sure they were clocked the same relative to each other. Then, the end vise was used to press the formers into the ends of the copper stretchers. It didn't take a lot of force to get the curves started. Then, the pieces were stood up on the bench and the recesses were formed to full depth with the formers and a dead blow mallet. |
|
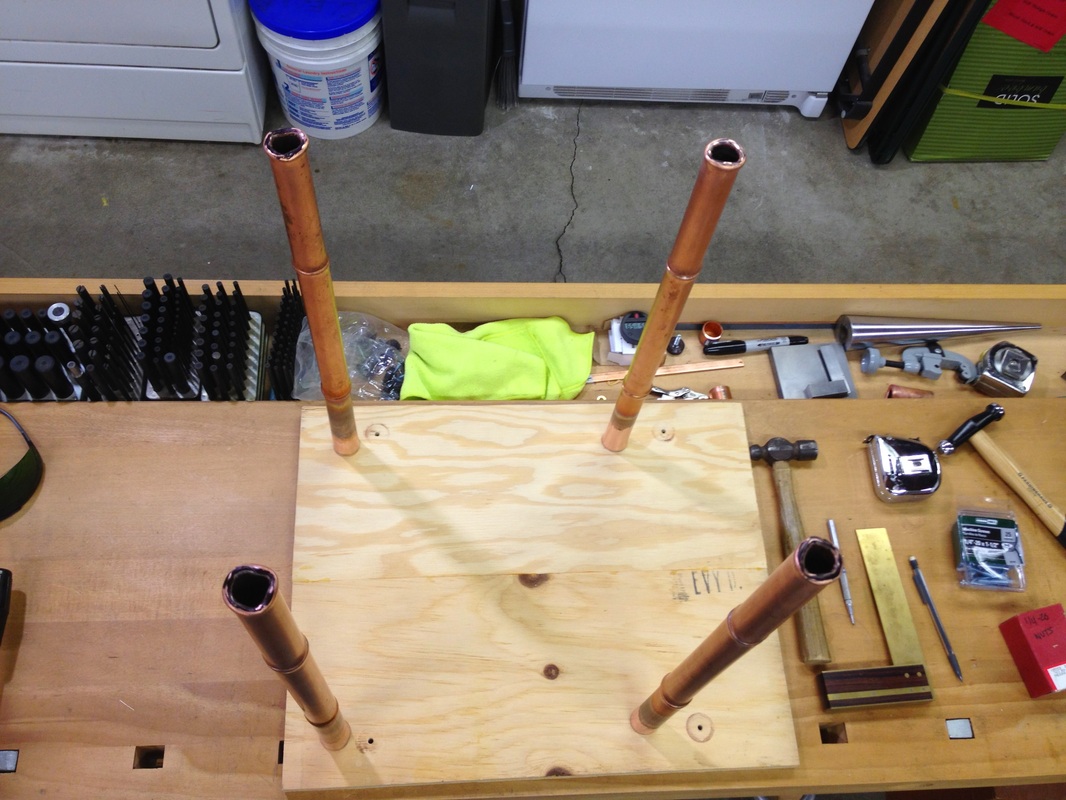
The legs and stretchers were finally completely formed and needed to be assembled into the final frame shape. It took me a while to figure out how to fixture them together so they could be adjusted into final position and held there until they were brazed together. The method that ended up working was a combination of two ideas.
First, to get the leg spacing correct, 1/4" holes were drilled at the appropriate spacing in a piece of MDF and then the legs were bolted to the board from underneath through the threaded nut plates. |
|
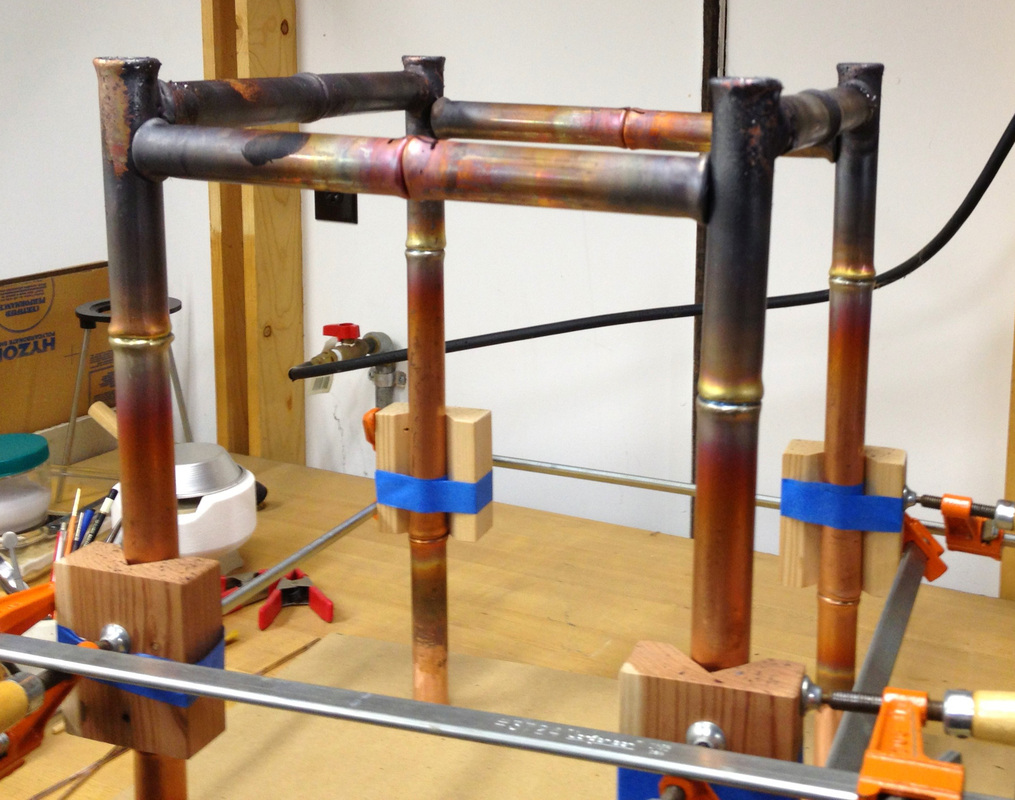
Second, to position the stretchers and lock all of the pieces together for brazing, a number of wooden v-blocks were made on the table saw at TechShop SJ. These wooden v-blocks were taped to the legs with blue painters tape to hold them in position long enough for bar clamps to be installed.
Once the bar clamps were tightened, the whole structure was surprisingly stable. The wooden v-blocks and the associated tape were positioned as far from the joints that were to be brazed as practical. Seeing them immediately burst into flame from the heat conducted into them wouldn't be much fun. |

|
Then it was time to get out the torch and do some serious braze work...while not inadvertently transferring a lot heat to any part of my body. The brazing went smoothly after the experience of brazing the components together.
Mr. Bozo came to visit, though, and the "not burning the hell out of myself" was a near thing. The only thing that saved me from a very nasty burn on the fingers and palm of my right hand (when I stupidly grabbed a too recently heated part of the frame) was the thin suede mechanic's glove I was wearing. They were never the same after part of their substance was permanently transferred to the copper, but my hand came through unscathed. I was very, very lucky. |
|
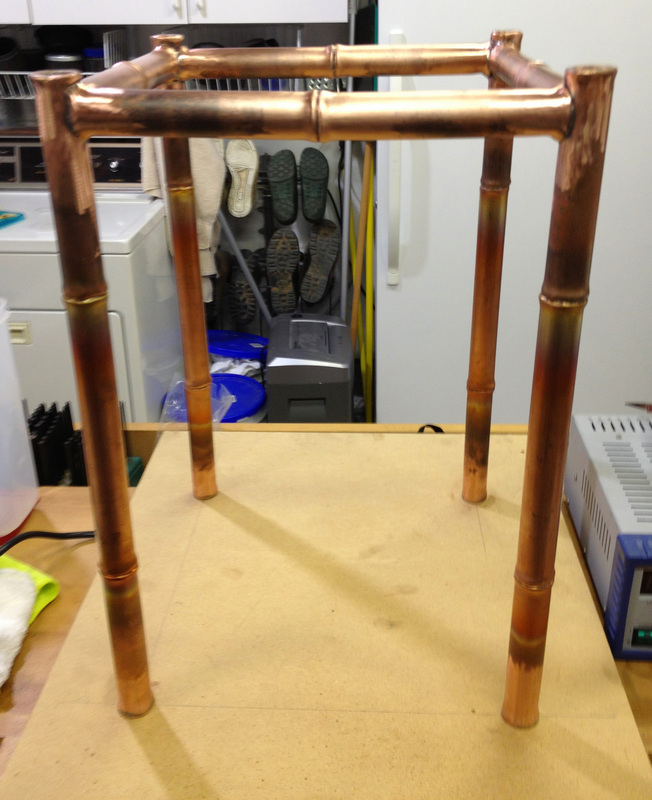
Overall assembly done, time for some clean up.
|
|
Copper frame complete, it was safe to finish the work on the top. After cutting the top to near final size, the end grain was covered with thin strips of bamboo veneer, and then the top was trimmed to its final size. The solid bamboo flooring takes a remarkably good finish from 400 grit sandpaper but I couldn't resist scraping it with a cabinet scraper. I really like a scraped finish instead of a sanded finish, especially if there is any grain to emphasize.
A few light coats of my favorite spray lacquer brought out the rich color of the caramelized/toasted bamboo. |
|
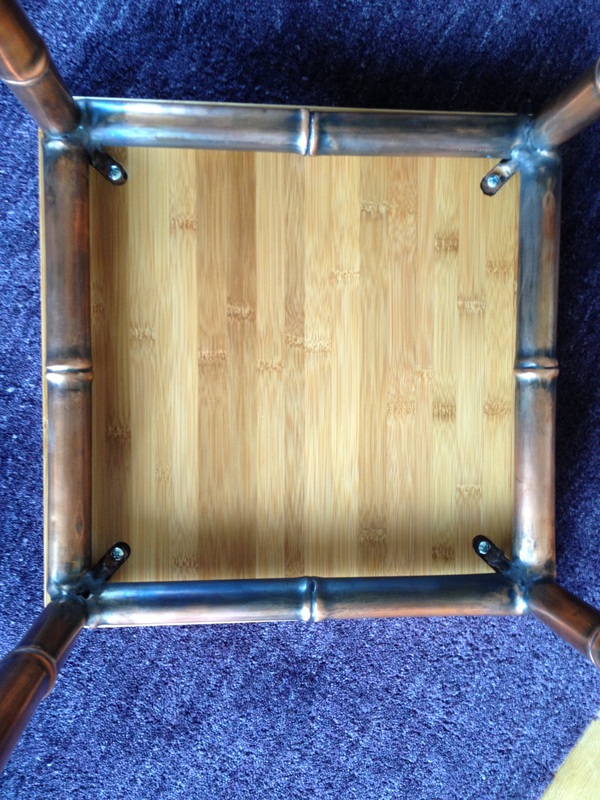
Then came the last assembly problem to solve: how to mount the top to the table.
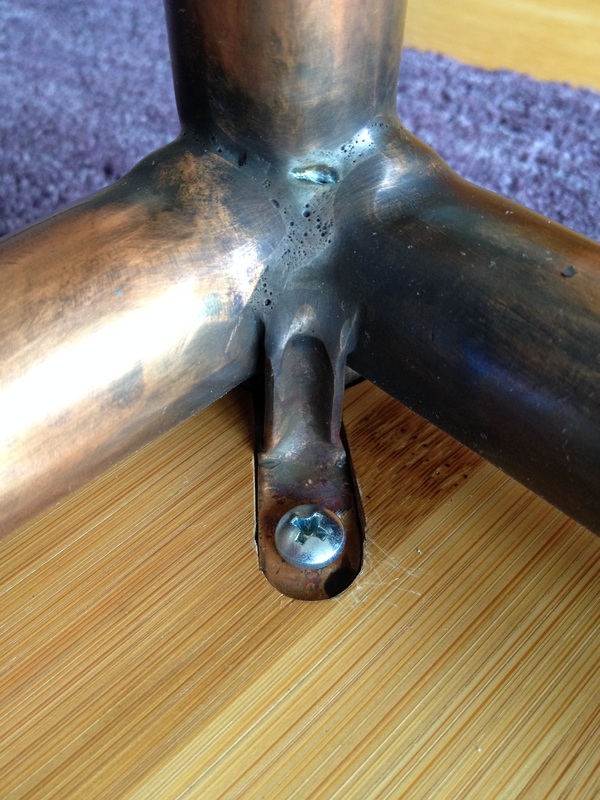
I kicked around various ideas and eventually settled on brazing L-brackets onto each corner and then recessing the tops of the legs and the L-brackets into shallow recesses routed into the underside of the table. The only vaguely complicated part of the task was putting a curve into the leg of the bracket so it could be tucked in between the stretchers. I used a forming block and the shaft of an appropriately sized transfer punch and hammered sufficiently hard on it to create the curve. Nothing else too difficult beyond getting everything lined up properly. Of course, all the firescale had to be removed from the areas around the joints...again. |
|
|
Sorry, no pix of this step. |
The adjustable feet were installed into the bottoms of the legs and I noticed a problem. The top surface of the plastic feet had significant bevels on them. Even when the feet were screwed all the way up into the leg, the bevels created a strong shadow line at the base of each leg that didn't look good. Since the feet were made of plastic, it was only a matter of chucking each one (gently!) into the lathe by its stem and turning off the top most surface of the plastic to remove the bevel. Removing this plastic may have reduced the strength of the feet somewhat, but in this light duty application it shouldn't be an issue.
|
|
Sorry, no pix of this step. |
The final step in the process was to color the copper. In the workshop at David's, he emphasized that coloring a piece could take as long as all of the fabrication combined.
At David's suggestion, I played around with a number of patina chemicals from Surfin Chemical down in LA. It turned out to be quite difficult to get an even finish. David recommends immersing any piece that is small enough to do so, but even this piece is a bit big for that to be practical. In the end, I just gave the copper a dark color by brushing on a coat of SUPERANTIK 44 Black Antique from Surfin and knocking it back with gray Scotchbrite. To make the color as rich as possible, I then ran a cloth that was very lightly dampened with mineral oil overall the metal surfaces. |
|
Done! |

|
